
Table of Contents
Bridge Pose, or Setu Bandha Sarvangasana, is one of those simple yoga poses that has a lot to offer. It opens the chest, strengthens the back and glutes, calms the nervous system, and encourages you to connect breath with lift. For a curious beginner, a trained daily practitioner, or working as a teacher, this guide will help you identify the signs of alignment and common mistakes, variations for different bodies, a practice plan, the biomechanical and emotional benefits of Yoga.
Get Confident! Join Our Yoga Teacher Training Course!
What is the bridge pose (setu bandha sarvangasana)?
Bridge Pose is a backbend and hip extension pose from a supine (lying on your back) position. The pelvis lifts, the chest opens, and the posterior chain (glutes, hamstrings, spinal erectors) activates to form a supported arch from knees to shoulders. Setu is a bridge in Sanskrit, and Bandha is a lock; the pose truly constructs a bridge of support within the body.
It’s available for numerous physiques, scales effortlessly with equipment, and is an incredible practical motion: you learn to raise with your glutes and posterior chain instead of over-arching the lumbar, which translates directly into real-life activities such as lifting, scaling, and standing tall.
Why practise Bridge Pose?
1: Which of these is the primary goal of yoga practice?
- Strengthens the glutes, hamstrings, and lower back.
- Opens the chest and counteracts forward-hunch posture.
- Improves spinal mobility through gentle extension.
- Calms the nervous system when practised with mindful breath.
- Great for sequencing, it’s both a preparatory and a closing pose in many classes.
Become a Certified Yoga Instructor
Yoga Teacher Training Course by Entri App: Master authentic yoga techniques, earn certification, and build a successful career as a professional yoga instructor.
Join Now!The anatomy behind the pose, what’s actually working
Bridge Pose recruits a combination of muscles and connective tissues:
- Gluteus maximus and hamstrings: primary hip extensors that lift the pelvis.
- Erector spinae: muscles along the spine that provide extension support.
- Quadriceps: stabilise the knee angle.
- Pelvic floor and deep core: work isometrically to maintain pelvic stability and protect the lumbar spine.
- Pectoralis major and minor, serratus anterior: gently open as the chest lifts.
- Thoracic spine: gains extension mobility, which helps offset chronic rounding.
Understanding this helps you cue the pose correctly: lift with the hips and glutes rather than forcing the lumbar spine into a deep arch.
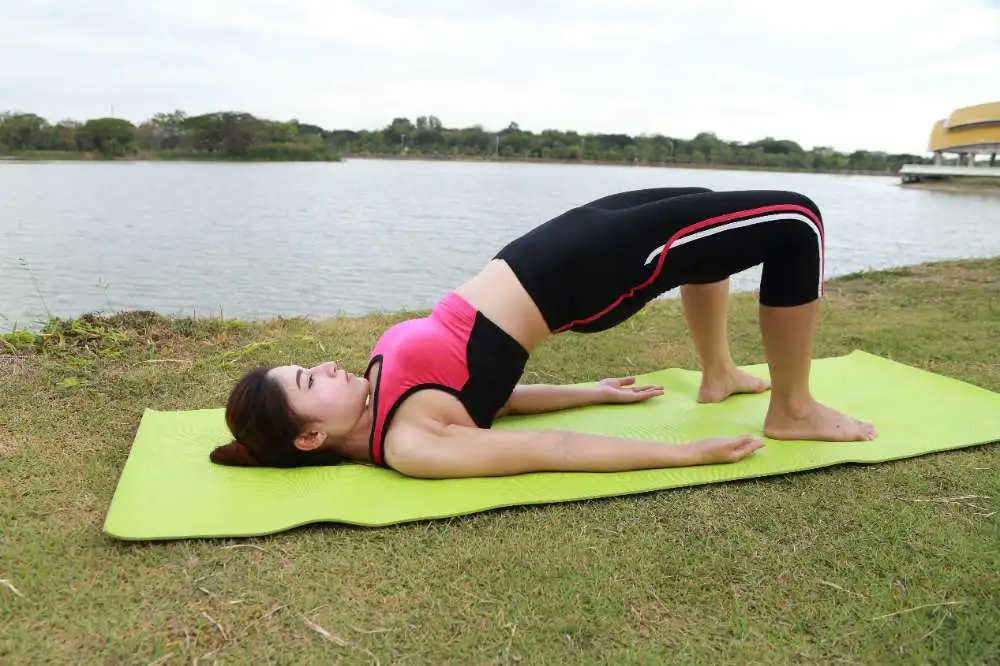
Step-by-step: How to do Bridge Pose (Setu Bandha Sarvangasana)
Preparation
- Lie on your back on a yoga mat. Knees bent, feet flat on the floor, hip-width apart. Heels should be close to the sitting bones (a small distance that lets you lift the hips without knee strain). Arms rest alongside your body, palms facing down.
- Feel both feet grounded evenly (inner and outer edges) and keep toes pointing straight forward.
The lift
- Root the feet. Press evenly through the whole foot, especially imagining a gentle drive through the heels.
- Inhale to prepare. Fill the belly with a calm inhale.
- Exhale and lift. On a steady exhale, engage the glutes and hamstrings and slowly lift your pelvis toward the ceiling. Think of lifting in three stages: sacrum, lower lumbar, upper lumbar. Keep the lift smooth.
- Tuck the tailbone lightly. Don’t jam the tailbone; find a neutral lift that slightly lengthens the lumbar spine.
- Clasp hands (optional). Interlace the fingers under your sacrum and extend through the arms. Rolling the shoulders underneath you can create a broader chest lift (be gentle with the neck).
- Hold with breath. Breathe steadily: typically 5–8 breaths for a static hold. Maintain a soft engagement of the pelvic floor and deep abdominals.
- Lower slowly. Exhale to lower vertebra by vertebra until your sacrum returns to the mat. Rest and repeat if desired.
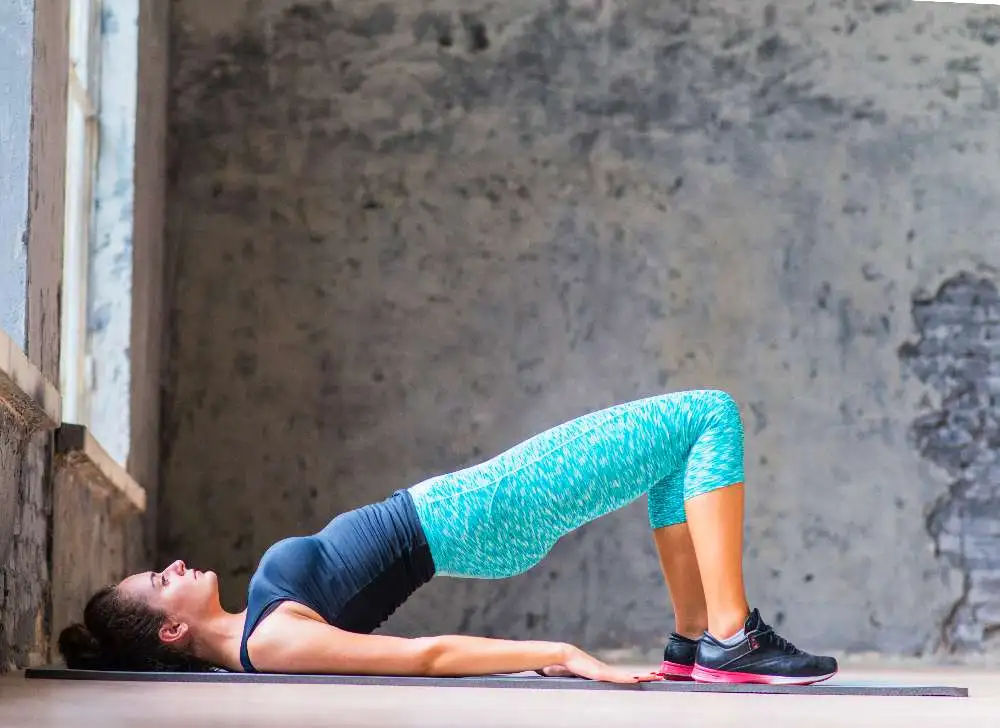
Key alignment points
- Knees remain hip-width and aligned over the ankles. Avoid letting the knees splay outward or collapse inward.
- Keep weight distributed through heels and the balls of the feet; avoid shifting too far forward onto toes.
- Neck stays neutral, gaze toward the ceiling and don’t turn the head while the chest is lifted.
- Avoid gripping the quads or clenching the jaw and neck. The lift should feel like glutes + hamstrings doing the work.
Cues that help beginners (practical, simple)
- “Press through your heels as if you were pushing the mat away.”
- “Imagine your pelvis is a bowl, gently lift the rim toward the ceiling.”
- “Keep knees tracking over second toes.”
- “Hold a block between the inner thighs if the knees feel like they’re wandering.”
- “If you interlace hands, slide the shoulder blades slightly under your back to open the chest.”
Become a Certified Yoga Instructor
Yoga Teacher Training Course by Entri App: Master authentic yoga techniques, earn certification, and build a successful career as a professional yoga instructor.
Join Now!Variations & prop options
Supported Bridge (with block or bolster)
- Place a block (medium or high) under your sacrum or a bolster across the sacrum for a restorative, supported version. This allows passive chest opening and is excellent for restorative practice or for those who need less active muscular effort.
One-leg Bridge (Eka Pada Setu Bandha)
- From lifted Bridge, extend one leg straight toward the ceiling, maintaining pelvic stability. This is more advanced, build to it only once you can hold a stable two-leg Bridge with good alignment.
Block between the thighs
- Squeezing a block between the inner thighs engages inner thigh muscles and helps keep knees tracking, making the lift feel more stable.
Micro-lifts (pelvic tilts)
- Small lifts (2–3 inches) done repeatedly are perfect for rehabilitation and for learning to isolate the glutes without over-arching the lumbar spine.
Bridge with toe-taps
- At the top of Bridge, gently lift one heel, tap the mat and return. This adds a dynamic stability challenge.
Common mistakes and how to fix them
1. Over-arching the lower back
Fix: Think of lifting from the hips and lengthening the spine rather than folding into the lumbar. Engage the glutes and draw the tailbone slightly in.
2. Knees splaying or collapsing
Fix: Place a block between the inner thighs or actively imagine drawing the knees toward each other while keeping hip-width.
3. Weight on the toes
Fix: Press through the heels and the ball of the big toe to redistribute the load.
4. Neck strain or turning head
Fix: Keep the neck long and neutral; gaze straight up. Don’t rotate while the chest is lifted.
5. Breath-holding
Fix: Coordinate lifts with an even exhale and maintain calm inhalations. Avoid Valsalva (bearing down).
Breath and bandhas: coordinating breath with the lift
Bridge is an excellent pose to practice coordinated breath. A useful pattern:
- Inhale to prepare.
- Exhale to lift (gentle pelvic-floor engagement on the exhale).
- Breathe normally at the top, keeping soft exhales and inhales (avoid breath-holding).
- Inhale to expand the belly before the next lift, exhale to engage.
If you use Mula Bandha (root lock) as part of your practice, keep it subtle, a gentle lift on the exhale paired with pelvic-floor awareness, not a forceful clamp.
Benefits of Bridge Pose
Physical benefits
- Strengthens posterior chain: Glutes, hamstrings and spinal extensors get a robust workout.
- Opens the chest and shoulders: Counteracts forward rounding from desks and phones.
- Improves hip mobility: Particularly hip extension, crucial for walking and posture.
- Supports pelvic stability: Helps integrate the pelvic floor and deep core with movement.
- Stimulates the thyroid (when chin slightly tucked in more advanced variations): Soft neck traction in supported variations can gently stimulate neck tissues; do this carefully.
Nervous system & emotional benefits
- Calms the nervous system: Practised with slow breath, Bridge can lower stress and anxiety.
- Boosts energy: The chest opening and gentle backbend can feel invigorating, lifting mood and countering lethargy.
- Restorative effect: Supported Bridge is deeply restorative and can be included in relaxation sequences.
Functional benefits off the mat
- Teaches safe hip-driven lifting that translates into better daily mechanics (lifting boxes, standing from low chairs).
- Improves posture and reduces lower-back strain from prolonged sitting.
Contraindications: who should be cautious?
The bridge is safe for most people, but use caution or avoid if you have:
- Acute lower-back pain or recent lumbar disc issues (get clearance from a healthcare professional).
- Severe neck injuries: avoid interlacing hands under the back, which can compress the cervical spine in some people.
- Certain shoulder injuries, modified by keeping arms by the sides or using a block instead of clasping hands.
- High blood pressure or glaucoma, avoid long holds or advanced variations without medical advice.
When in doubt, practise supported Bridge with a block or bolsters to reduce active load.
A practical Bridge sequence (20 minutes)
This short, repeatable flow is great on its own or as part of a longer practice.
- Gentle centring (2 minutes): lie down and connect with the breath.
- Pelvic tilts (3 minutes): small movement to warm up the lower back (10–12 tilts).
- Bridge micro-lifts (5 minutes): 6–8 lifts of 5–8 breaths each, focus on glutes and even foot pressure.
- Supported Bridge (5 minutes): block under sacrum or bolster for a restorative hold, breathe deeply.
- Supine twist & Savasana (5 minutes): gentle twist each side, then rest.
This practice balances strength, mobility, and relaxation in one chunk.
A 45-minute class featuring Bridge
- Opening & breathwork (5 minutes): Seated breath awareness, gentle neck rolls.
- Warm-up (10 minutes): Cat–Cow, low lunge sequences, hamstring mobilisations.
- Standing sequence (10 minutes): Sun salutations, warrior variants, and hip openers leading to a hamstring stretch.
- Bridge block (12 minutes): Pelvic tilts → Active Bridge → Supported Bridge → One-leg Bridge prep.
- Cool down & Savasana (8 minutes): Supine twists, legs up the wall (Viparita Karani,) and final relaxation.
How often should you practice Bridge?
Daily micro-practice (2–5 minutes) is awesome: short lifts, supported holds and pelvic floor coordination will solidify better patterns. For strength work, 3–4 focused sessions per week of longer Bridge holds and progressions are great. As always, listen to your body.
How Entri’s Yoga TTC course complements Bridge practice
If you’re learning to teach or simply want to deepen your anatomy and cueing knowledge, Entri’s Yoga Teacher Training Course (TTC) aligns perfectly with the Bridge Pose curriculum. The course typically offers:
- Module on anatomy: clear, practical explanations of the hip extensors, pelvic floor and thoracic mobility, so your cueing is anatomically precise.
- Sequencing workshops: how to place Bridge within therapeutic and energetic sequences.
- Adaptation strategies: how to modify for pregnancy, postpartum and injury recovery, essential for safe teaching.
- Hands-on cueing and language: practice real teacher-student interactions so your verbal and hands-on cues are effective and compassionate.
For teachers-in-training, knowing the biomechanics behind Bridge transforms a generic cue into specific, reproducible results for students.
Troubleshooting & progression plan (8 weeks)
If you want measurable progress:
- Weeks 1–2: Daily pelvic tilts and micro-lifts (3× per day, 10 reps). Focus: breath and awareness.
- Weeks 3–4: Full Bridges 3× per session (6–8 breaths each). Add a block between thighs. Focus: glute activation.
- Weeks 5–6: Supported Bridge holds (3–5 minutes), begin single-leg prep. Focus: stability.
- Weeks 7–8: One-leg Bridge attempts with reduced range (2–3 reps each side), integrate into 45-minute flow. Focus: strength & balance.
Track how the hips and low back feel; rest a day if soreness appears.
Key takeaways: remember these points
- Bridge is a functional backbend and hip extension that strengthens the posterior chain while opening the chest.
- Lift with the glutes and hamstrings; avoid forcing lumbar over-extension.
- Use props like blocks and bolsters for restorative or rehabilitative practice.
- Breathe steadily, exhale on the lift, and avoid breath-holding.
- Practise consistently (short daily work + longer sessions 3–4x weekly) to see real improvements.
- Entri’s Yoga TTC provides anatomy, sequencing, and teaching skills that enhance safe, effective cueing and progression for students.
Closing Thoughts
Bridge Pose is a beautiful, practical posture that gives you strength, stability, and an open chest, and it’s versatile enough to be adapted for restoration or strength work. Practise with attention to alignment, breath, and small progressions, and your Bridge will stop being a passive pose and become an active tool to improve posture, movement, and wellbeing.
If you’re serious about teaching Bridge reliably and safely, Entri’s Yoga TTC pairs anatomy, sequencing, adaptation, and cueing training so you can guide students (and yourself) with clarity and confidence.
Become a Certified Yoga Instructor
Yoga Teacher Training Course by Entri App: Master authentic yoga techniques, earn certification, and build a successful career as a professional yoga instructor.
Join Now!Frequently Asked Questions
What is Bridge Pose (Setu Bandhasana)?
Bridge Pose is a backbend yoga posture that strengthens the spine, glutes, and thighs while opening the chest and improving flexibility.
How do I perform Bridge Pose correctly?
Lie on your back, bend your knees, place your feet hip-width apart, press through your heels, and lift your hips towards the ceiling while keeping your shoulders grounded.
What are the main benefits of Bridge Pose?
It strengthens the lower back, improves posture, stimulates digestion, relieves stress, and enhances core stability.
How does Bridge Pose affect mental health?
It calms the mind, reduces anxiety, and promotes emotional balance by stimulating the thyroid and improving blood circulation.
Can Bridge Pose help in improving flexibility?
Absolutely! It stretches the chest, spine, and hip flexors, enhancing flexibility and mobility over time.
How can Entri’s Yoga TTC Course help me master Bridge Pose?
Entri’s Yoga Teacher Training Course provides expert-led sessions, anatomical insights, and personalised guidance to help you perfect Bridge Pose and other essential asanas confidently.


