
Table of Contents
Patchwork Stitching Techniques make sewing simple and creative. They help join small fabric pieces into beautiful designs. This is easy for beginners. It allows freedom to mix colors and patterns. Each stitch slowly forms interesting shapes. Every piece adds beauty and detail. This makes patchwork fun and relaxing. It also helps improve basic sewing skills.
This stitching is simple and enjoyable for everyone. It encourages creativity and careful handwork. Small projects build confidence and patience. Simple tools help beginners start easily. Practice improves stitching accuracy and neatness. Mistakes become useful learning steps. Each project feels satisfying to complete. This keeps learners motivated and inspired.
Learn Advanced Designing & Boutique Skills with Experts. Join Now!
Introduction
Patchwork stitching is a timeless craft with global cultural value. It combines tradition, creativity, and careful sewing practice. Many cultures have preserved this art across generations. It teaches patience, accuracy, and thoughtful design planning. Each stage requires careful attention and steady hand control. This improves discipline and stitching confidence over time. Learning gradually strengthens creative thinking and technical skill. Every project adds valuable practical experience.
This craft transforms simple fabrics into meaningful creative pieces. Small patches slowly combine into larger visual patterns. Balanced designs depend on careful color and shape selection. Texture differences add depth and artistic interest. These elements create visually pleasing fabric compositions. Thoughtful planning improves pattern flow and harmony. This balance makes patchwork creative and functional. Each project reflects individual artistic expression.
This stitching supports learning & personal creativity. Beginners start with basic shapes and simple layouts. Experienced learners explore complex patterns and decorative stitches. Each level offers new challenges and creative rewards. Continuous practice strengthens control and design understanding. This steady improvement builds confidence and creative independence. Skill development occurs naturally through consistent effort. Every finished piece brings satisfaction and motivation.
This craft also supports mindful and sustainable fabric practices. Leftover materials gain renewed artistic purpose. This reduces waste and supports responsible fabric usage. Creative reuse encourages conscious design decisions. Such practices benefit both makers and the environment. This approach promotes ethical and thoughtful craftsmanship. It encourages respect for materials and resources. Sustainability becomes part of the creative journey.
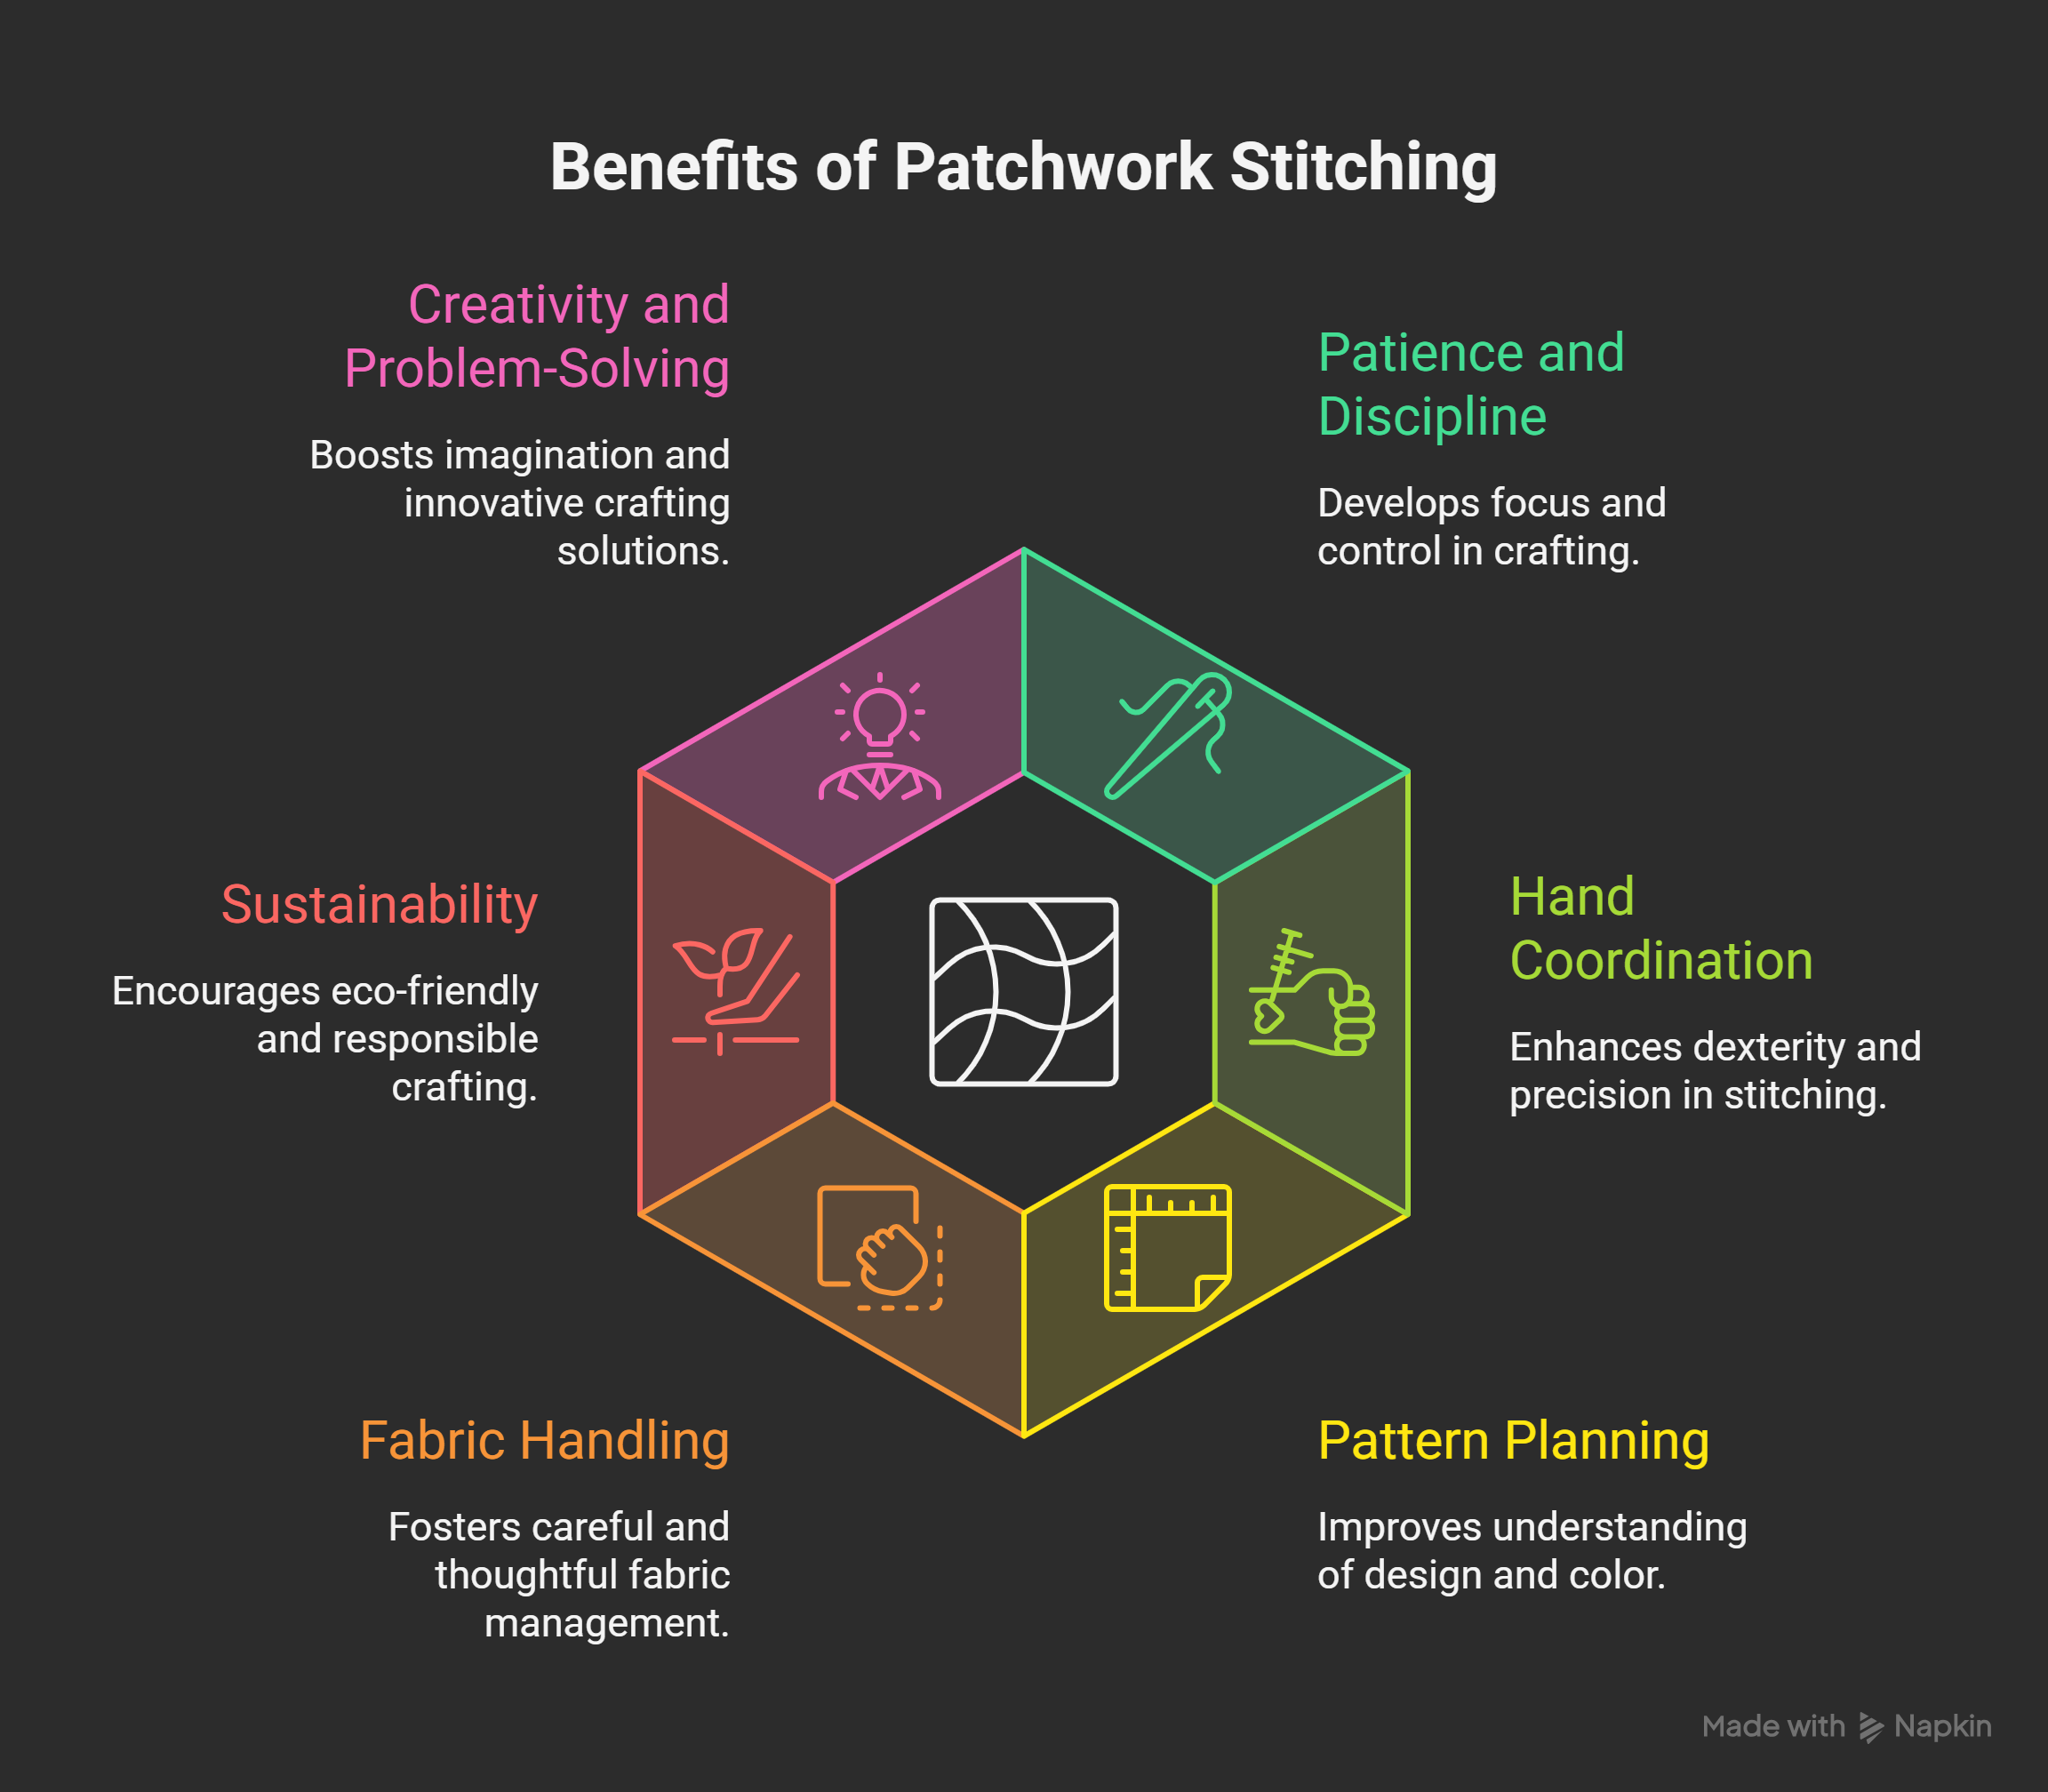
Why Learning Patchwork Stitching Is Helpful
-
Builds patience, discipline, and creative focus.
-
Improves hand coordination and stitching accuracy.
-
Enhances pattern planning and color understanding.
-
Encourages thoughtful fabric handling skills.
-
Promotes sustainable and responsible crafting habits.
-
Strengthens attention, creativity, and problem-solving ability.
What This Guide Will Cover
-
Meaning and purpose of patchwork stitching.
-
Common stitching techniques explained clearly.
-
Essential fabrics and tools required.
-
Step-by-step stitching process for beginners.
-
Practical tips for neat stitching results.
What Is Patchwork Stitching?
Patchwork stitching is a craft using small fabric pieces. These pieces, called patches, are stitched together to form designs. Multiple patches create patterned, decorative, and functional textiles. The method blends sewing skill with creative thinking. It values patience, precision, and artistic imagination. Patchwork has existed for centuries across cultures. People reused worn fabric for warmth and decoration. Over time, it became both art and tradition. Today, patchwork combines heritage with modern fashion design. Beginners learn planning, cutting, and careful stitching. Each patch adds color, shape, and texture. Thoughtful selection improves design harmony and stitch accuracy. Patterns can be structured or freeform, offering flexibility.
Key Features and Benefits
Patchwork joins multiple pieces into unified designs. It uses stitching to secure patches firmly. The craft encourages creativity and careful layout planning. Texture, color, and shape enhance visual appeal. It reduces fabric waste and supports sustainability. Projects develop patience, focus, and sewing skills. Proper techniques improve seam strength and finishing. Patchwork preserves cultural traditions and storytelling. Completed pieces are functional or decorative. The method promotes artistic freedom and personal expression.
Master Fashion Designing and Create Your Signature Style
Unlock your creative potential with our expert-led Fashion Designing course. Build in-demand skills and step confidently into the world of fashion!
Begin Your Fashion Career Today!Types of Patchwork Stitching Techniques
Patchwork stitching uses various creative sewing methods. Each method produces unique fabric designs. Techniques differ in structure, freedom, and skill requirements. Choosing the right technique improves project results and confidence. Some methods use hand stitching, others use machines. Understanding techniques helps select suitable designs efficiently.
1. Traditional Patchwork
Uses geometric fabric shapes forming structured patterns.
Shapes: Squares, rectangles, triangles, diamonds
Features: Structured layout, clean seams, balanced appearance
Uses: Quilts, bed covers, table runners, cushions
2. Crazy Patchwork
Uses irregular fabric pieces with no strict rules.
Characteristics: Random layout, decorative stitching, high creativity
Decorative Stitches: Feather, chain, blanket, herringbone
Uses: Wall hangings, cushions, handbags, decorative panels
3. English Paper Piecing
Fabric wraps around paper templates and is hand stitched.
Shapes: Hexagons, diamonds, triangles, squares
Advantages: Precise alignment, neat edges, easy pattern matching
Uses: Quilts, decorative panels, cushions, fabric art
4. Foundation Paper Piecing
Fabric stitched directly onto printed paper templates.
Benefits: Extreme accuracy, complex designs, perfect seams
Uses: Detailed quilts, wall hangings, artistic panels
5. Appliqué Patchwork
Fabric shapes stitched onto a base fabric.
Motifs: Flowers, leaves, animals, abstract forms
Stitches: Blanket, slip, satin, straight
Uses: Clothing, cushions, children’s items, wall décor
6. Strip Piecing
Long strips stitched into panels then cut smaller.
Advantages: Faster stitching, reduced waste, uniform seams
Uses: Quilts, bedspreads, table covers
7. Log Cabin
Rectangular strips stitched around central squares.
Design: Symmetrical, balanced colors, classic appearance
Uses: Quilts, cushions, bed throws
8. Cathedral Window
Folded fabric forms window-like decorative effects.
Features: Dimensional texture, layered folds, elegant design
Uses: Quilts, wall hangings, decorative covers
9. Seminole Patchwork
Colorful strips form geometric repeating patterns.
Design: Bold, structured, symmetrical layouts
Uses: Garments, quilts, decorative panels, accessories
Choosing the Right Technique
Consider skill level, design, fabric, and time. Beginners start simple; advanced users try complex designs. Gradually build skills for long-term mastery.
Suggested Learning Order: Traditional → Strip → Crazy → Appliqué → English → Foundation
Fabrics and Tools Used for Patchwork Stitching
Patchwork stitching needs careful fabric and tool selection. Right materials improve stitch quality and durability. Good tools support accuracy and stitching comfort. Proper choices ensure smoother project completion. Beginners benefit from simple, easy-to-handle fabrics. Experienced learners use advanced materials for complex designs. Each choice affects the project’s final appearance. Fabric selection influences ease of stitching and design clarity. Suitable fabrics maintain seam alignment and thickness. Wrong fabrics cause uneven stitching and distortion. Cotton, linen, silk, wool, and denim are common choices. Cotton is easy, stable, and affordable. Linen gives rustic texture but frays easily. Silk adds luxury and smooth finish. Wool provides warmth and rich texture. Denim offers strength and bold visual character.
Fabric and Tool Guidelines
Choose fabrics of similar thickness for even seams. Pre-wash and iron fabrics before cutting. Match colors and textures for harmonious design. Test-stitch scraps to ensure compatibility. Proper tools improve comfort and accuracy. Cutting tools include fabric scissors and rotary cutters. Measuring tools like rulers and tapes ensure uniform patches. Marking tools guide stitching placement accurately. Pins and clips hold fabrics in place. Stitching tools include hand needles and sewing machines. Thread choice affects seam strength and appearance. Pressing tools like irons flatten seams neatly. Organized storage protects tools and improves efficiency. Maintain tools regularly for long-lasting performance.
Key Benefits
-
Accurate and neat seam finishes
-
Easier fabric handling and cutting
-
Strong, durable stitching
-
Consistent patch alignment
-
Professional project appearance
-
Reduced errors and fatigue
-
Supports sustainable and creative crafting
Proper fabrics and tools ensure successful patchwork projects. They enhance stitching quality, durability, and visual appeal.
Learn Advanced Designing & Boutique Skills with Experts. Join Now!
Step-by-Step Patchwork Stitching Process
Patchwork stitching follows a careful and organized working sequence. Each step ensures accuracy, neatness, and proper design alignment. Following steps in correct order prevents mistakes and fabric damage. This structured process supports smooth project completion. Each stage builds toward a clean finished product. Careful planning ensures better stitching results.
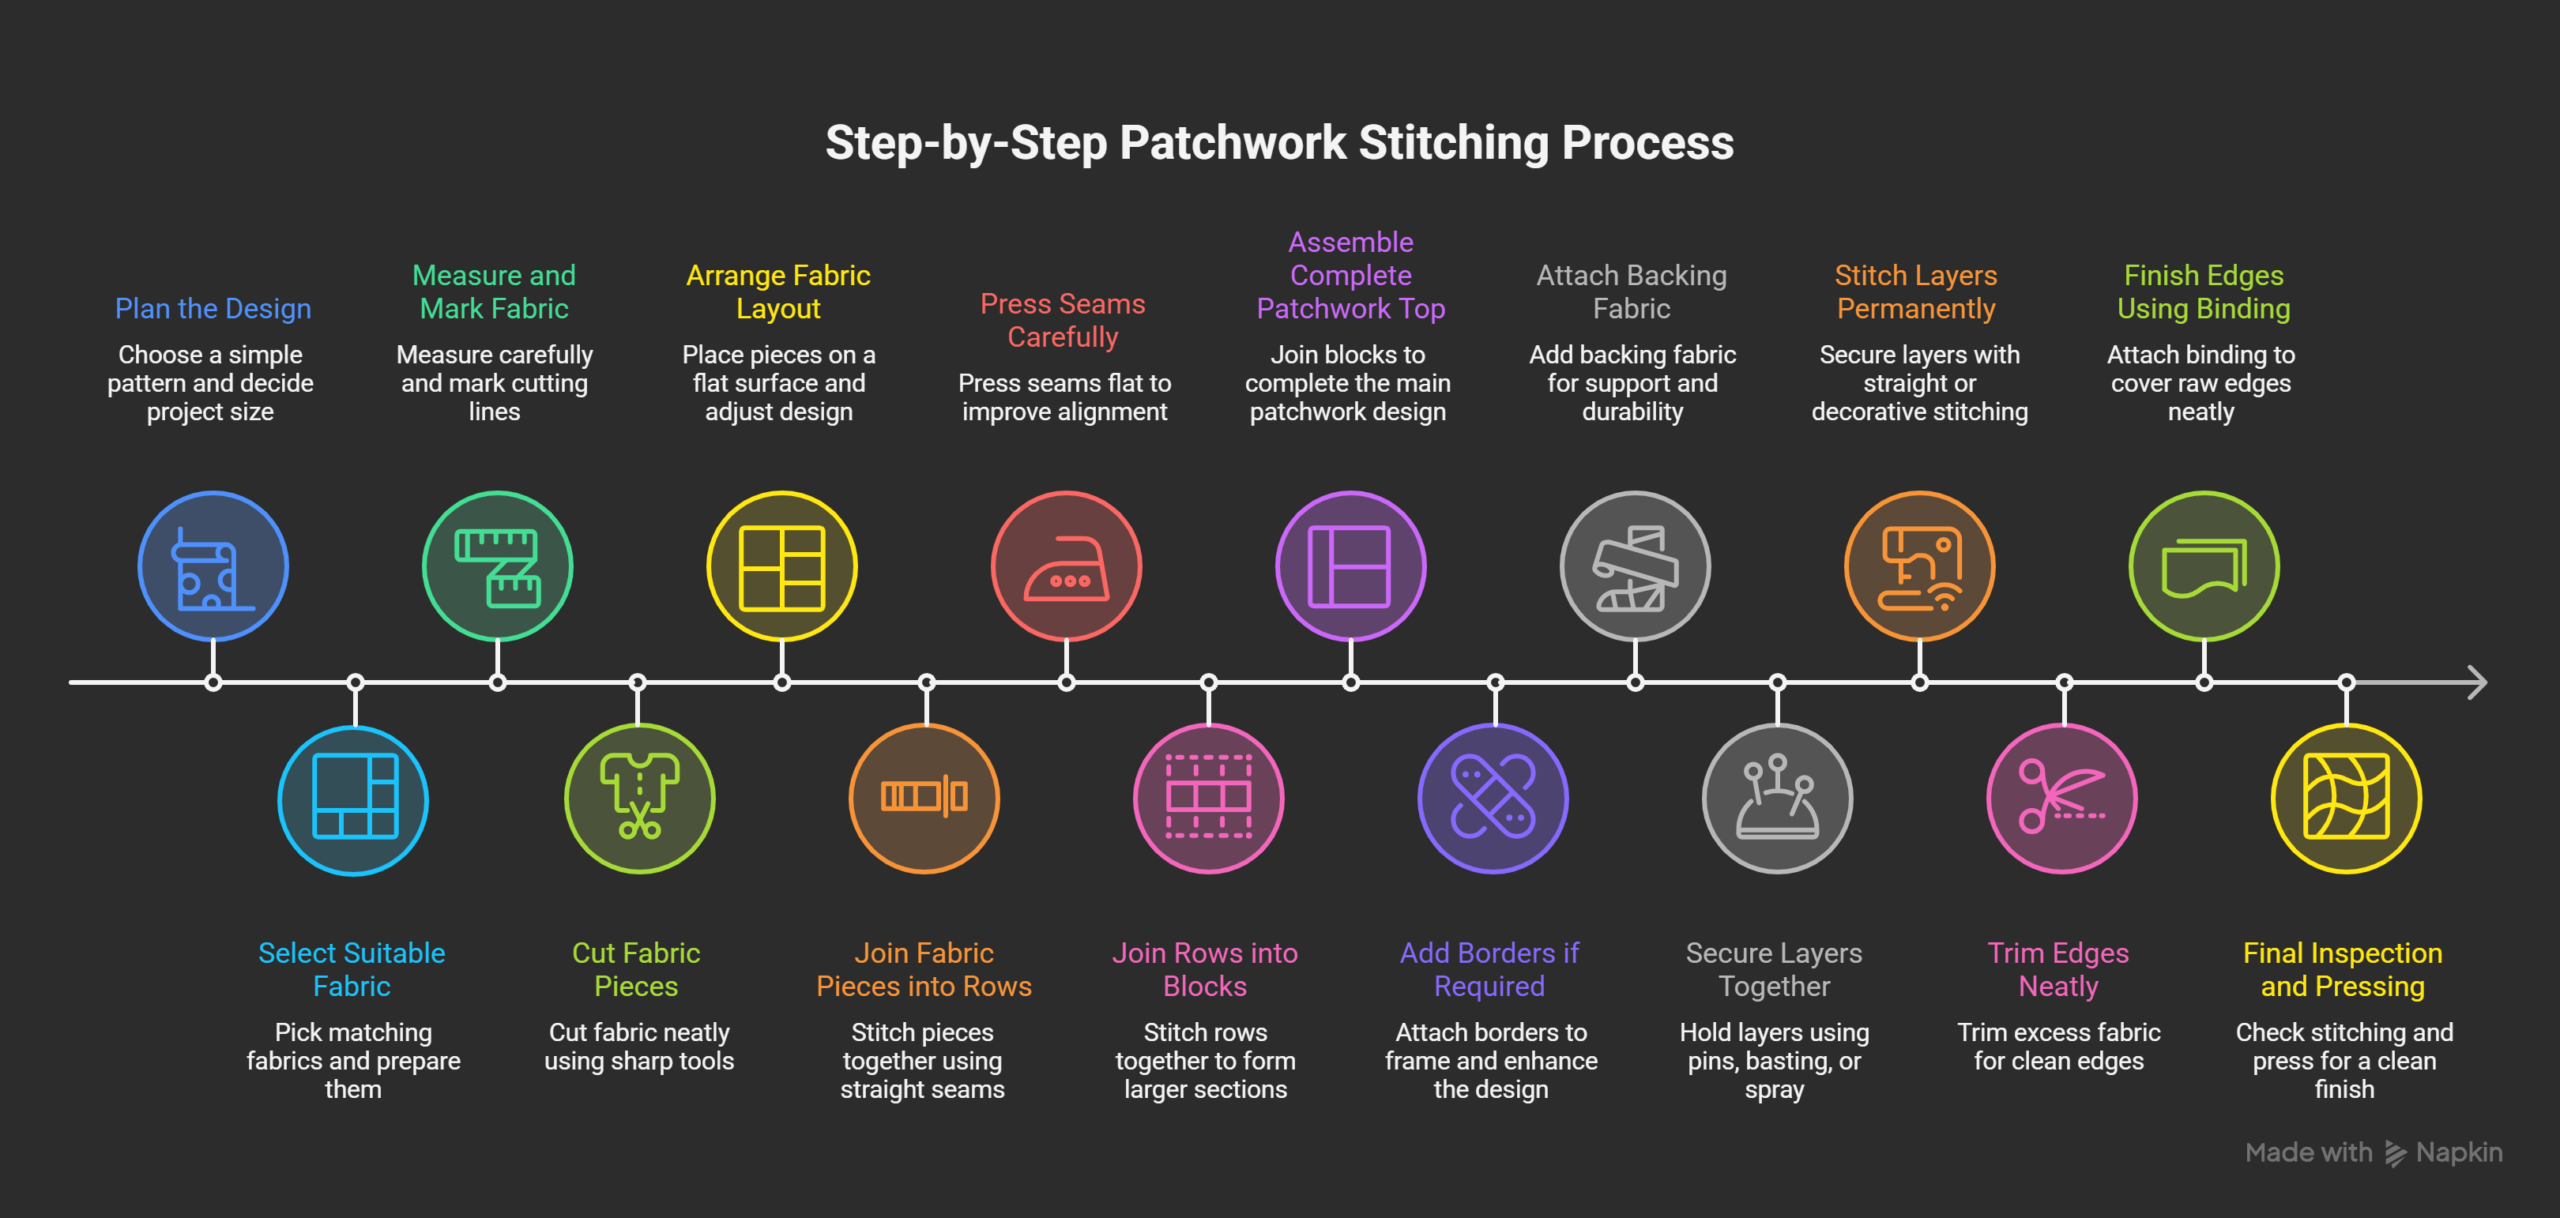
Step 1: Plan the Design
Design planning begins before any fabric cutting. Clear planning improves overall project organization. It helps visualize the final pattern arrangement. This stage defines shape, size, and layout structure. Good planning reduces stitching errors significantly. It also saves fabric and working time.
Design Planning Actions
-
Choose suitable patchwork pattern
-
Select layout structure carefully
-
Decide project size clearly
-
Identify shape combinations
-
Sketch rough design plan
Benefits of Design Planning
-
Improves stitching accuracy
-
Prevents layout confusion
-
Saves material usage
-
Enhances visual harmony
Step 2: Select Suitable Fabric
Fabric selection determines stitching ease and design quality. Matching fabric thickness improves seam consistency. Color coordination enhances visual appeal. Texture balance ensures surface smoothness. Proper selection simplifies cutting and stitching steps.
Fabric Selection Guidelines
-
Choose fabrics with similar thickness
-
Select compatible color combinations
-
Avoid slippery fabric initially
-
Prefer easy-handling materials
Preparation Tips
-
Wash fabric before cutting
-
Dry fabric completely
-
Iron fabric carefully
Step 3: Measure and Mark Fabric
Accurate measurement ensures uniform patch sizes. Consistent sizing improves design alignment. Precise marking guides clean cutting lines. This stage requires patience and careful attention. Errors here affect final appearance.
Measuring Tools Used
-
Rulers
-
Measuring tape
-
Cutting grids
Marking Methods
-
Fabric chalk
-
Washable pens
-
Tailor pencils
Helpful Tips
-
Measure twice before cutting
-
Mark clear straight lines
-
Check pattern placement carefully
Step 4: Cut Fabric Pieces
Cutting converts design plans into workable fabric patches. Clean cutting ensures accurate piece alignment. Sharp tools prevent fabric fraying. Smooth edges improve seam joining. Careful cutting avoids material waste.
Cutting Guidelines
-
Use sharp cutting tools
-
Follow marked lines carefully
-
Maintain steady cutting pressure
-
Keep fabric flat during cutting
Safety Measures
-
Cut away from fingers
-
Store tools safely after use
Step 5: Arrange Fabric Layout
Layout arrangement determines design flow and balance. This step checks pattern harmony and color distribution. Visual inspection prevents placement errors. Adjustments improve overall design symmetry. Final arrangement prepares for stitching.
Layout Techniques
-
Arrange pieces on flat surface
-
Check color contrast
-
Balance light and dark shades
-
Ensure shape alignment
Adjustment Tips
-
Rearrange pieces if needed
-
Photograph layout for reference
-
Confirm design satisfaction
Step 6: Join Fabric Pieces into Rows
Row stitching forms the foundation of patchwork construction. Pieces stitch together using consistent seam allowance. Uniform stitching ensures clean and straight seams. This step requires steady hand control. Precision improves pattern accuracy.
Row Stitching Steps
-
Place right sides together
-
Align fabric edges carefully
-
Pin pieces before stitching
-
Stitch along marked seam lines
Seam Allowance Tips
-
Maintain consistent seam width
-
Avoid uneven stitching pressure
-
Backstitch seam ends securely
Step 7: Press Seams Carefully
Pressing flattens seams and improves fabric smoothness. This step enhances overall stitching appearance. Flat seams improve alignment for later joining.
Pressing Techniques
-
Press seams after every row
-
Open seams gently
-
Avoid stretching fabric
-
Use suitable heat settings
Pressing Benefits
-
Improves design neatness
-
Enhances seam durability
-
Maintains fabric flatness
Step 8: Join Rows into Blocks
Row joining creates larger design blocks. Accurate seam matching ensures clean intersections. Careful alignment prevents uneven stitching. This stage requires extra attention. Patience ensures high-quality outcomes.
Block Joining Steps
-
Align seam intersections
-
Pin matching points carefully
-
Stitch steadily across seams
-
Press seams after joining
Alignment Tips
-
Match seam points precisely
-
Use pins for stability
-
Stitch slowly for accuracy
Step 9: Assemble Complete Patchwork Top
Block assembly forms the complete patchwork surface. Careful joining ensures smooth design continuity. Consistent alignment maintains pattern accuracy. This stage reveals final design appearance.
Assembly Guidelines
-
Arrange blocks correctly
-
Check overall pattern flow
-
Stitch blocks systematically
-
Press after every seam
Step 10: Add Borders if Required
Borders frame the patchwork design neatly. They enhance visual definition and balance. Borders also provide size adjustment flexibility. They add structural stability.
Border Selection Tips
-
Choose complementary fabric colors
-
Maintain border width consistency
-
Stitch borders carefully
Step 11: Attach Backing Fabric
Backing supports the patchwork surface. It adds strength and durability. This step prepares for final finishing. Smooth backing improves project longevity.
Backing Preparation Steps
-
Select suitable backing fabric
-
Iron backing smoothly
-
Align edges carefully
-
Pin layers securely
Step 12: Secure Layers Together
Layer securing prevents fabric shifting. This step stabilizes the entire structure. It prepares the project for final stitching.
Securing Methods
-
Pin basting
-
Thread basting
-
Temporary spray adhesive
Step 13: Stitch Layers Permanently
Permanent stitching secures the entire structure. This step locks layers together firmly. It improves strength and durability.
Stitching Options
-
Straight line stitching
-
Decorative stitching
-
Hand quilting stitches
Step 14: Trim Edges Neatly
Edge trimming removes excess fabric. Clean edges improve finishing quality. This prepares for binding attachment.
Trimming Guidelines
-
Use sharp scissors
-
Trim evenly
-
Maintain straight edges
Step 15: Finish Edges Using Binding
Binding covers raw fabric edges neatly. It prevents fabric fraying. It enhances professional finishing appearance.
Binding Steps
-
Prepare binding strips
-
Attach binding evenly
-
Fold and stitch securely
-
Press binding edges
Step 16: Final Inspection and Pressing
Final inspection ensures stitching accuracy. Pressing improves overall smoothness. This step completes the project.
Inspection Checklist
-
Check seam strength
-
Inspect edge finishing
-
Review overall design balance
-
Confirm stitching neatness
Time and Effort Estimation Table
| Project Size | Estimated Time | Skill Level |
|---|---|---|
| Small project | 3–5 hours | Beginner |
| Medium project | 6–12 hours | Intermediate |
| Large project | 15–30 hours | Advanced |
Common Mistakes to Avoid
-
Skipping design planning
-
Inaccurate measurement
-
Uneven seam allowance
-
Poor fabric alignment
-
Insufficient pressing
Helpful Tips for Better Results
-
Stitch slowly for accuracy
-
Press frequently
-
Check alignment regularly
-
Maintain clean workspace
-
Practice consistently
Summary of Stitching Process
Patchwork stitching requires organized step execution. Each stage contributes to design accuracy. Careful handling ensures clean and durable results. This structured process supports creative success. Following steps builds confidence and skill.
Master Fashion Designing and Create Your Signature Style
Unlock your creative potential with our expert-led Fashion Designing course. Build in-demand skills and step confidently into the world of fashion!
Begin Your Fashion Career Today!Conclusion
Patchwork stitching blends creativity with careful handwork and patience. Each project builds valuable sewing and design skills. Simple techniques slowly develop confidence and artistic understanding. Consistent practice improves accuracy, control, and design awareness. Thoughtful fabric choices enhance visual balance and harmony. Careful stitching ensures clean and durable results. This craft offers both creative satisfaction and practical learning.
Patchwork encourages mindful crafting and responsible fabric use. Small efforts create meaningful and lasting handmade pieces. Every completed project brings pride and creative fulfilment. This journey supports continuous learning and personal artistic growth. Each stitch strengthens patience and creative discipline. Patchwork remains timeless, expressive, and deeply rewarding.
Master Fashion Designing and Create Your Signature Style
Unlock your creative potential with our expert-led Fashion Designing course. Build in-demand skills and step confidently into the world of fashion!
Begin Your Fashion Career Today!Frequently Asked Questions
What is patchwork stitching mainly used for?
Patchwork stitching is used to join small fabric pieces creatively. It helps create decorative and functional textile items. Common products include quilts, cushion covers, bags, garments, and wall décor. This craft allows creative design using simple sewing methods. It also supports fabric reuse and waste reduction. Patchwork helps transform leftover materials into meaningful handmade creations.
Is patchwork stitching easy for beginners to learn?
Yes, patchwork stitching is very beginner friendly. Simple shapes and straight seams make learning easy. Beginners can start with small projects to build confidence. Regular practice improves stitching control and accuracy. Step-by-step learning helps develop patience and discipline. Over time, learners gain better understanding of fabric handling and design planning.
Which fabric works best for patchwork stitching projects?
Cotton fabric is the best option for patchwork stitching. It is easy to cut, stitch, and press. Cotton also holds shape well and gives neat seams. Beginners find it comfortable to handle and control. It is widely available in many colors and patterns. This makes cotton ideal for creative design exploration.
Can patchwork stitching be done using hand sewing methods?
Yes, patchwork stitching can be done completely by hand. Hand stitching offers greater control and precision. It is useful for small and detailed projects. Many traditional patchwork designs still use hand stitching. It allows slower and more mindful crafting. This method also improves patience and fine motor skills.
Is a sewing machine required for patchwork stitching?
A sewing machine is not mandatory for patchwork stitching. However, it speeds up the stitching process. Machines help maintain straight and consistent seams. They reduce physical effort during long projects. Beginners may start with hand stitching before using machines. Both methods produce beautiful patchwork designs.
How much time does a patchwork stitching project usually take?
Project time depends on size and complexity. Small projects take a few hours to complete. Medium projects may require several days of work. Large projects can take weeks of careful stitching. Design detail and stitching speed affect total time. Regular practice gradually improves working speed and accuracy.
What are the easiest patchwork techniques for beginners?
Traditional patchwork and strip piecing are easiest for beginners. These methods use simple shapes and straight stitching. They help build basic sewing confidence. Beginners learn fabric alignment and seam control. These techniques provide structured learning opportunities. They also offer quick and satisfying project completion.
How can neat and durable stitching be achieved?
Neat stitching requires accurate measurement and cutting. Pressing seams after stitching improves smoothness. Stitching slowly ensures better seam alignment. Consistent seam allowance improves design clarity. Proper fabric preparation prevents distortion. These steps create clean and durable patchwork results.
Can leftover fabric scraps be reused for patchwork stitching?
Yes, leftover fabric scraps are ideal for patchwork stitching. Small pieces reduce fabric waste effectively. Creative reuse supports sustainable crafting practices. Scraps can form colorful and meaningful designs. This approach encourages responsible material usage. It also makes patchwork economical and eco-friendly.
What skills can be developed through patchwork stitching?
Patchwork stitching develops patience and focus. It improves hand coordination and accuracy. It strengthens creative thinking and planning skills. It encourages careful observation and problem solving. It also builds confidence through project completion. These skills support overall creative growth and craftsmanship.


