
Table of Contents
Fashion design begins with strong visual expression. Every great outfit starts with a simple sketch. Learning to Draw Fashion Croquis Easily builds design confidence. It helps transform ideas into visible fashion concepts. Beginners often struggle with proportions and poses. A clear method makes croquis drawing less intimidating. Practice improves both speed and accuracy. Croquis act as a creative design foundation. They support imagination and structured thinking.
Fashion croquis are simple yet powerful tools. They help designers communicate ideas visually. You do not need advanced art skills initially. Understanding basics makes learning smooth and enjoyable. Simple steps reduce fear of drawing figures. Consistency matters more than perfection here. Anyone can learn with regular practice. This guide explains everything clearly and simply.
Learn Advanced Designing & Boutique Skills with Experts. Join Now!
Introduction
Fashion design begins with expressing ideas visually. Sketching helps designers communicate creative clothing concepts. Fashion croquis form the base of fashion illustration. They simplify the human body for easy garment sketching. Many beginners feel unsure about drawing human figures. This often creates fear and hesitation while starting. Learning croquis removes this fear gradually. It makes fashion sketching simple and enjoyable.
Fashion croquis focus on clothing, not realistic anatomy. They allow faster idea development and experimentation. Designers use croquis to explore multiple styles quickly. They also help improve proportion understanding. With practice, croquis drawing becomes effortless. Anyone can learn with simple steps and consistency.
Key Highlights of Fashion Croquis Learning:
-
Helps visualize fashion ideas clearly
-
Improves speed in fashion sketching
-
Simplifies complex human proportions
-
Boosts creative confidence gradually
-
Supports better garment presentation
-
Suitable for beginners and students
Fashion croquis act as a design language. They connect imagination with visual representation. Mastering croquis strengthens overall fashion skills.
What Is a Fashion Croquis?
A fashion croquis is a basic fashion figure sketch. It serves as a foundation for fashion design drawings. Designers use croquis to draw clothing ideas clearly. The figure is stylized, not anatomically realistic. It highlights garments instead of body details.
Simple Definition of Fashion Croquis
A fashion croquis is a simplified human body outline. It is used repeatedly for sketching fashion designs. The same base supports multiple outfit ideas. This saves time during the design process.
Purpose of a Fashion Croquis
Fashion croquis have a clear design purpose. They help designers focus on clothing elements.
Main Purposes Include:
-
Acting as a reusable design base
-
Supporting quick fashion sketching
-
Improving clothing proportion accuracy
-
Enhancing design clarity
Key Characteristics of a Fashion Croquis
Fashion croquis have distinct visual features. These features separate them from realistic drawings.
Common Characteristics:
-
Elongated body proportions
-
Minimal facial details
-
Simplified hands and feet
-
Emphasis on posture
Fashion Croquis vs Regular Human Sketch
| Feature | Fashion Croquis | Regular Human Sketch |
|---|---|---|
| Body shape | Stylized and elongated | Realistic proportions |
| Purpose | Clothing illustration | Anatomy practice |
| Details | Minimal body details | High body detail |
| Usage | Fashion designing | Art studies |
Who Uses Fashion Croquis?
Fashion croquis are used across fashion fields. They are common among design professionals and students.
Users Include:
-
Fashion design students
-
Professional fashion designers
-
Illustrators and stylists
-
Fashion educators
Importance in the Design Process
Croquis help translate ideas into visual form. They bridge creativity and design execution. Designers rely on croquis for consistency. This makes fashion sketching more efficient.
Master Fashion Designing and Create Your Signature Style
Unlock your creative potential with our expert-led Fashion Designing course. Build in-demand skills and step confidently into the world of fashion!
Begin Your Fashion Career Today!Why Fashion Croquis Are Important in Fashion Design
Fashion croquis play a vital role in design creation. They support clear and organized fashion illustration. Designers depend on croquis for visual consistency. They make the design process faster and smoother.
Supports Clear Design Visualization
Croquis help visualize clothing ideas clearly. They present garments in a structured form. Design elements appear more balanced and neat.
Key Visualization Benefits:
-
Clear outfit shape representation
-
Balanced clothing proportions
-
Better silhouette understanding
Improves Design Efficiency
Fashion croquis save valuable design time. They remove the need for repeated figure drawing. Designers can focus directly on garments.
Efficiency Advantages:
-
Faster sketching process
-
Easy design modifications
-
Multiple outfits on one base
Enhances Creative Exploration
Croquis allow quick experimentation with ideas. Designers can try different styles easily. This encourages creativity and innovation.
Creative Benefits:
-
Easy style variations
-
Quick idea testing
-
Freedom to explore concepts
Helps Maintain Proportional Accuracy
Croquis maintain consistent body proportions. This improves garment fit visualization. Designs look more professional and refined.
Proportion Control Benefits:
-
Uniform figure structure
-
Accurate clothing placement
-
Improved design symmetry
Improves Communication and Presentation
Croquis make designs easier to explain. They help share ideas with teams. Clients understand concepts more clearly.
Communication Advantages:
-
Clear visual storytelling
-
Professional design presentation
-
Reduced misunderstanding
Role of Fashion Croquis in Design Workflow
| Design Stage | Role of Fashion Croquis |
|---|---|
| Concept creation | Visual idea foundation |
| Design development | Style experimentation |
| Presentation | Clear design communication |
| Review process | Consistent design comparison |
Fashion croquis strengthen overall design quality. They support confidence in fashion design execution.
Materials Needed to Draw Fashion Croquis
Drawing fashion croquis requires simple and accessible materials. You do not need expensive tools initially. Basic supplies are enough for beginners. The right materials improve comfort and drawing control. They also help achieve clean and confident sketches. Using proper tools builds consistency and confidence.
Basic Drawing Materials
Basic materials form the foundation of croquis drawing. They are easy to find and affordable. Every beginner should start with these essentials.
Essential Basic Materials:
-
Pencil
-
Eraser
-
Paper
-
Ruler
Each tool has a specific purpose. Together, they support accurate sketching.
Pencils for Fashion Croquis
Pencils are the most important drawing tool. They allow light sketching and easy corrections. Different pencil grades serve different needs.
Common Pencil Types:
-
HB pencil for light sketching
-
2B pencil for darker outlines
-
Mechanical pencil for clean lines
HB pencils are beginner friendly. They create smooth and controlled strokes. Avoid very dark pencils initially.
Erasers and Their Importance
Erasers help correct mistakes easily. They keep drawings clean and neat. Good erasers prevent paper damage.
Types of Erasers:
-
Rubber eraser for general use
-
Kneaded eraser for light corrections
Kneaded erasers lift graphite gently. They do not leave marks behind. Clean sketches improve presentation quality.
Paper Selection for Croquis Drawing
Paper quality affects drawing comfort. Smooth paper supports clean lines. Thick paper prevents tearing issues.
Recommended Paper Types:
-
Sketchbook paper
-
Drawing paper
-
Printer paper for practice
Avoid textured paper initially. Smooth surfaces suit croquis drawing better. Practice sheets can be reused multiple times.
Rulers and Measurement Tools
Rulers help maintain straight guidelines. They support correct proportions and balance. Beginners benefit greatly from rulers.
Uses of Rulers:
-
Drawing balance lines
-
Dividing body proportions
-
Maintaining symmetry
Clear rulers improve visibility. Short rulers are easy to control.
Optional Traditional Drawing Tools
Optional tools enhance sketch appearance. They are useful after basic practice.
Optional Tools Include:
-
Fine liners
-
Black pens
-
Colored pencils
Fine liners define final outlines. Use them only after pencil sketches. Colored pencils add simple visual appeal.
Markers and Their Usage
Markers add boldness to designs. They highlight garment shapes clearly. They are optional for beginners.
Marker Usage Tips:
-
Use light pressure
-
Avoid excessive coloring
-
Test markers before use
Markers bleed through thin paper. Always test on spare sheets.
Digital Tools for Fashion Croquis
Digital tools offer flexibility and speed. They are popular among modern designers. Beginners can explore them gradually.
Common Digital Tools:
-
Drawing tablets
-
Stylus pens
-
Illustration software
Digital tools allow easy edits. They also save physical materials. Mistakes are easily corrected digitally.
Advantages of Digital Materials
Digital materials improve workflow efficiency. They reduce repetitive manual work. Design storage becomes easier.
Digital Tool Benefits:
-
Undo and redo options
-
Layer-based drawing
-
Easy file sharing
However, basic drawing skills remain essential. Digital tools support, not replace, fundamentals.
Comparison of Traditional and Digital Materials
| Aspect | Traditional Materials | Digital Materials |
|---|---|---|
| Cost | Low initial cost | Higher initial cost |
| Portability | Easy to carry | Device dependent |
| Editing | Manual corrections | Easy digital edits |
| Learning curve | Simple for beginners | Requires software learning |
Both methods have unique benefits. Choose based on comfort and access.
Organizing Your Drawing Materials
Organized tools improve drawing efficiency. They reduce distractions during practice. Keep materials within easy reach.
Organization Tips:
-
Use pencil cases
-
Separate clean papers
-
Store tools safely
Good organization supports regular practice. Consistency improves croquis drawing skills.
Learn Advanced Designing & Boutique Skills with Experts. Join Now!
Understanding Fashion Croquis Body Proportions
Fashion croquis use stylized body proportions. These proportions differ from real human anatomy. They help garments appear elegant and elongated. Understanding proportions improves sketch consistency. It also enhances overall design presentation quality.
What Body Proportions Mean in Fashion Croquis
Body proportions describe body part relationships. They are measured using head units. One head equals one measurement unit. The body height uses multiple head units. This system ensures visual balance.
Why Proportions Matter:
-
Create a professional fashion look
-
Maintain consistency across sketches
-
Improve clothing placement accuracy
Standard Fashion Croquis Proportion System
Most fashion croquis use nine head proportions. Some designers prefer ten or eleven heads. Longer proportions emphasize clothing flow. They create a runway-inspired appearance.
Common Proportion Standards:
-
8 heads: semi-realistic fashion figure
-
9 heads: standard fashion croquis
-
10 heads: high-fashion illustration
-
11 heads: editorial or couture style
Beginners should start with nine heads. It offers balance and control.
Breakdown of Fashion Croquis Body Sections
Each body part follows a fixed proportion. These sections align vertically from head to feet.
Basic Body Section Breakdown:
-
Head: one unit
-
Neck and shoulders: half unit
-
Bust line: second unit
-
Waist line: third unit
-
Hips: fourth unit
-
Thighs: fifth and sixth units
-
Knees: sixth unit midpoint
-
Calves: seventh and eighth units
-
Feet: final unit
This breakdown supports accurate sketching. It keeps body alignment visually correct.
Importance of Elongated Legs
Legs appear longer in fashion croquis. They occupy most body height. This creates a tall and slim silhouette.
Benefits of Long Legs:
-
Enhance garment drape appearance
-
Improve runway style effect
-
Highlight lower body designs
Long legs are intentional exaggerations. They are not anatomical errors.
Upper Body Proportion Guidelines
The upper body remains slim and narrow. Shoulders appear slightly wider than hips. The torso stays simple and clean.
Upper Body Proportion Tips:
-
Keep shoulders straight and balanced
-
Avoid bulky chest outlines
-
Maintain a narrow waist
These guidelines keep focus on clothing. They reduce visual distractions.
Arm and Hand Proportions
Arms appear long and slender. Hands usually reach mid-thigh level. Fingers remain simplified and minimal.
Arm Proportion Rules:
-
Upper arm equals forearm length
-
Elbows align near waist level
-
Hands stay small and understated
Simplified hands save sketching time. They maintain clean illustration flow.
Balance and Alignment in Proportions
Balance lines help maintain symmetry. They run vertically through the body. Misalignment affects overall sketch quality.
Alignment Checkpoints:
-
Head centered on balance line
-
Shoulders evenly placed
-
Hips aligned with shoulders
-
Feet balanced under body
Good alignment improves visual stability. It prevents awkward body postures.
Common Proportion Mistakes to Avoid
Beginners often misjudge body lengths. These mistakes affect design clarity.
Frequent Errors Include:
-
Short legs and long torso
-
Oversized head proportions
-
Uneven shoulder placement
-
Crooked body alignment
Awareness helps prevent repeated errors. Practice improves proportion accuracy gradually.
Fashion Croquis Proportions Comparison Table
| Body Part | Realistic Figure | Fashion Croquis |
|---|---|---|
| Head count | 7 to 8 heads | 9 to 11 heads |
| Leg length | Shorter | Longer |
| Torso width | Natural | Slimmer |
| Hand detail | Detailed | Minimal |
This table highlights proportion differences clearly. It supports better visual understanding.
Developing Proportion Consistency
Consistency matters more than perfection. Use the same proportion system repeatedly. This builds muscle memory over time.
Consistency Practices:
-
Use head units regularly
-
Maintain fixed body sections
-
Review sketches for balance
Strong proportion knowledge builds confidence. It strengthens overall fashion illustration skills.
Master Fashion Designing and Create Your Signature Style
Unlock your creative potential with our expert-led Fashion Designing course. Build in-demand skills and step confidently into the world of fashion!
Begin Your Fashion Career Today!Step-by-Step Guide: How to Draw Fashion Croquis Easily
Drawing fashion croquis becomes easy with clear steps. A structured approach reduces confusion and fear. Each step builds confidence gradually. Follow the sequence carefully for best results. Practice regularly to improve speed and accuracy.
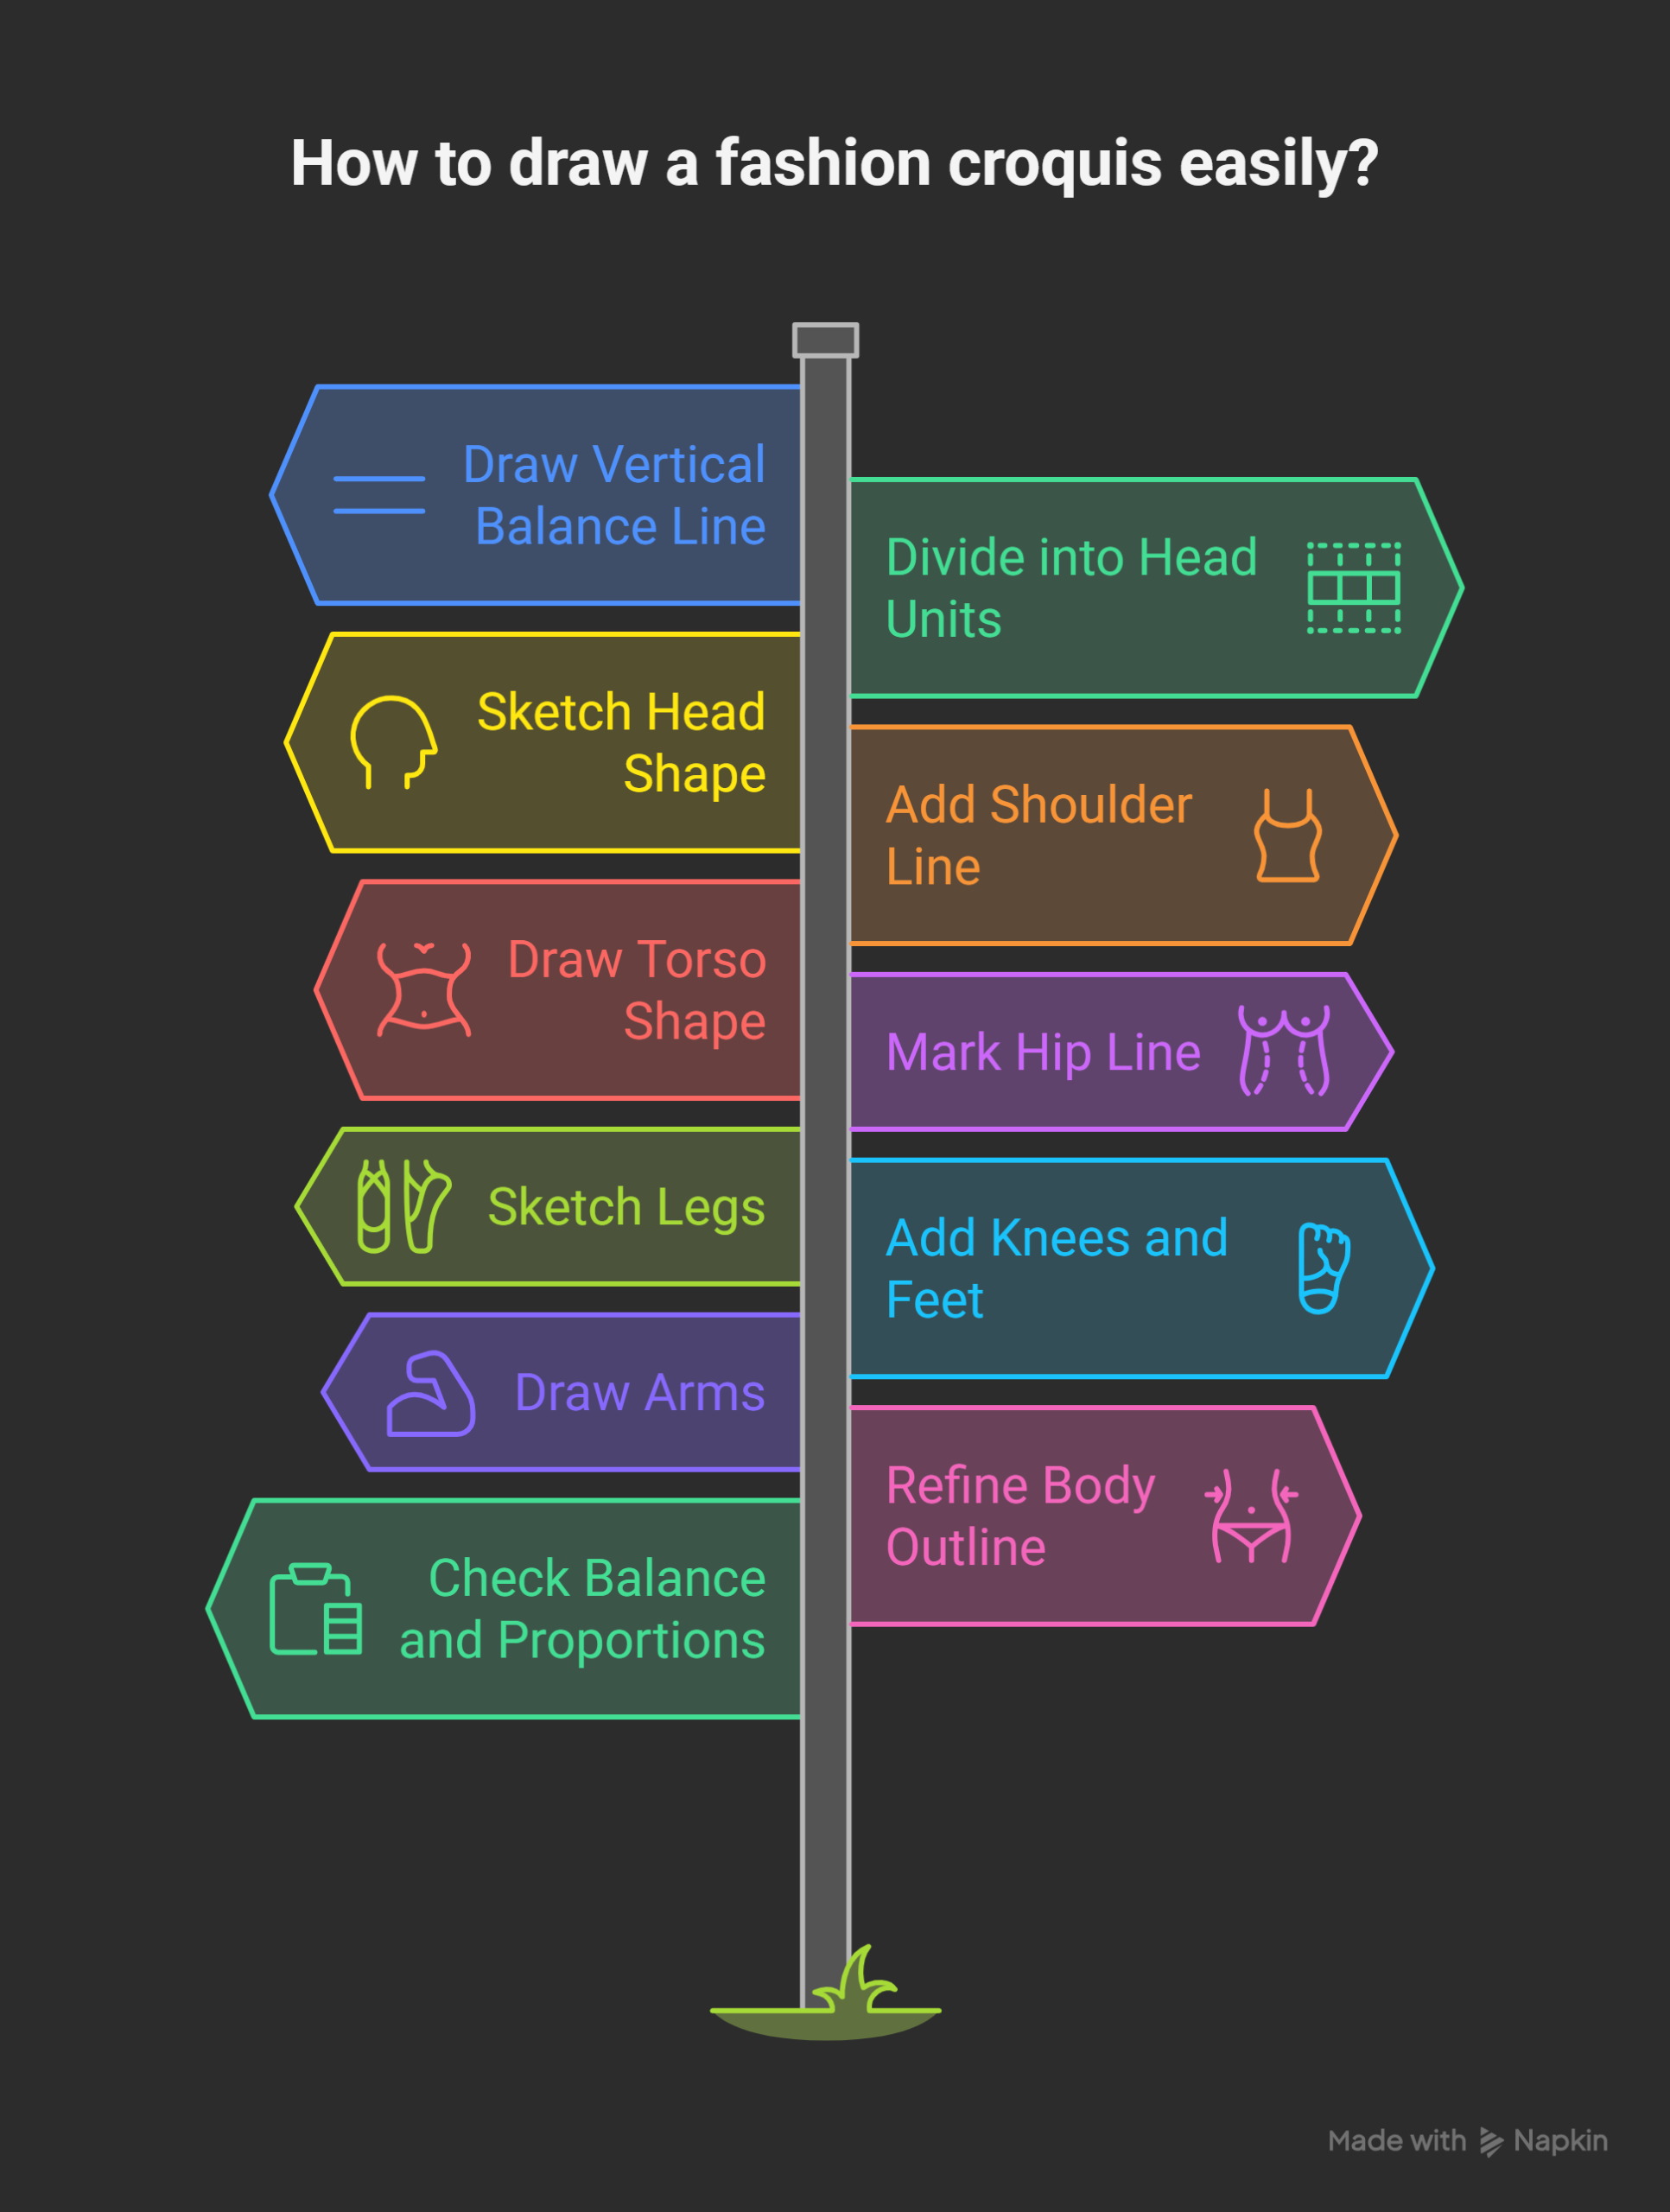
Step 1: Draw the Vertical Balance Line
Begin with a straight vertical line. This line represents the body’s centre balance. It controls posture and symmetry. Always draw this line lightly.
Why the Balance Line Matters:
-
Maintains body alignment
-
Prevents tilted figures
-
Supports clean posture
This line guides the entire sketch. Never skip this step.
Step 2: Divide the Line into Head Units
Mark equal sections along the balance line. Each section equals one head length. Use nine head units for beginners.
Head Unit Guidelines:
-
One unit equals head height
-
Nine units create fashion proportions
-
Keep spacing equal
Accurate division improves proportion control. Use a ruler initially if needed.
Step 3: Sketch the Head Shape
Draw an oval at the top. Keep the head simple and clean. Avoid facial details at this stage.
Head Drawing Tips:
-
Use light pencil strokes
-
Keep proportions consistent
-
Avoid oversized shapes
The head sets scale for the body. Accuracy here improves the whole figure.
Step 4: Add the Shoulder Line
Draw a horizontal shoulder line. Place it slightly below the head. Keep shoulders balanced and straight.
Shoulder Placement Tips:
-
Shoulders wider than hips
-
Avoid slanted shoulder lines
-
Keep lines light
Balanced shoulders support garment structure. They influence outfit appearance greatly.
Step 5: Draw the Torso Shape
Sketch the torso using simple lines. Connect shoulders to waist gently. Keep the waist narrow and defined.
Torso Drawing Guidelines:
-
Avoid bulky shapes
-
Maintain smooth curves
-
Keep lines minimal
The torso supports clothing placement. Simplicity improves clarity.
Step 6: Mark the Hip Line
Draw the hip line at correct height. It usually falls at the fourth head unit. Keep hips slightly narrower than shoulders.
Hip Line Tips:
-
Draw straight horizontal line
-
Keep symmetry on both sides
-
Avoid exaggerated width
Proper hips improve outfit balance. They anchor lower garments visually.
Step 7: Sketch the Legs
Legs are the longest body section. Draw long straight lines downward. Slight angles add natural movement.
Leg Drawing Rules:
-
Legs occupy most body height
-
Keep thighs and calves slim
-
Avoid short leg proportions
Long legs create fashion elegance. They enhance garment flow visually.
Step 8: Add Knees and Feet
Mark knees around the sixth head unit. Draw small feet at the base. Keep feet simple and minimal.
Lower Body Tips:
-
Knees should align evenly
-
Feet point slightly outward
-
Avoid oversized feet
Minimal feet maintain illustration focus. They complete the body structure.
Step 9: Draw the Arms
Arms extend from shoulders naturally. Elbows align near waist level. Hands reach mid-thigh area.
Arm Drawing Guidelines:
-
Keep arms slender
-
Use simple line shapes
-
Avoid detailed fingers
Arms add posture expression. They should not overpower the design.
Step 10: Refine the Body Outline
Smooth the rough construction lines. Define the body shape gently. Erase unnecessary guidelines carefully.
Refinement Tips:
-
Strengthen clean outlines
-
Remove extra sketch marks
-
Keep lines confident
Refining improves professional appearance. Clean lines enhance readability.
Step 11: Check Balance and Proportions
Review the entire figure carefully. Check alignment from head to feet. Correct uneven sections if needed.
Final Checks Include:
-
Centered head position
-
Balanced shoulders and hips
-
Even leg lengths
Final checks prevent major errors. They ensure visual stability.
Step-by-Step Summary Table
| Step | Purpose |
|---|---|
| Balance line | Controls posture |
| Head units | Maintain proportions |
| Head sketch | Set body scale |
| Torso and hips | Support garments |
| Legs and arms | Create fashion silhouette |
| Refinement | Improve clarity |
Following these steps builds confidence. Practice makes fashion croquis drawing effortless.
Easy Fashion Croquis Poses for Beginners
Starting with simple poses builds confidence quickly. Easy poses help beginners understand body balance. They reduce complexity during early practice stages. Simple poses support better clothing visualization. They also improve posture and alignment understanding.
Why Beginners Should Start with Easy Poses
Easy poses focus on structure and balance. They prevent confusion while learning croquis basics. Complex poses can overwhelm beginners initially.
Benefits of Simple Poses:
-
Easier body proportion control
-
Faster sketch completion
-
Better posture understanding
-
Improved confidence levels
Simple poses create a strong foundation. They prepare learners for advanced poses later.
Straight Standing Pose
The straight standing pose is the easiest. The body remains fully aligned vertically. Both feet rest evenly on the ground.
Pose Characteristics:
-
Vertical balance line remains straight
-
Shoulders and hips stay parallel
-
Legs remain close together
This pose suits beginner practice well.
It highlights clothing structure clearly.
One Leg Bent Pose
This pose adds slight movement. One leg remains straight and grounded. The other leg bends gently.
Key Features:
-
Hips tilt slightly
-
Weight shifts onto one leg
-
Body remains mostly upright
This pose feels natural and relaxed. It introduces movement without complexity.
Hand on Waist Pose
This pose adds attitude and style. One arm rests on the waist. The other arm hangs naturally.
Pose Guidelines:
-
Elbow points outward slightly
-
Shoulder remains relaxed
-
Waist curve becomes visible
This pose enhances garment silhouette. It works well for fitted outfits.
Walking Pose
Walking poses show gentle motion. One leg moves forward slightly. The opposite arm swings forward.
Walking Pose Tips:
-
Keep movement minimal
-
Avoid extreme angles
-
Maintain balance line
This pose suits casual wear sketches. It adds life to illustrations.
Crossed Leg Pose
Crossed legs create elegance. One leg crosses in front. The body remains straight.
Pose Features:
-
Legs form a soft angle
-
Feet stay close together
-
Hips remain aligned
This pose looks stylish and calm. It works well for formal outfits.
Relaxed Leaning Pose
This pose shows casual confidence. The body leans slightly sideways. Weight rests on one leg.
Leaning Pose Guidelines:
-
Keep lean subtle
-
Maintain shoulder balance
-
Avoid extreme bends
This pose suits modern fashion styles. It adds personality to designs.
Common Beginner Pose Mistakes
Beginners often overcomplicate poses. This affects balance and proportions.
Mistakes to Avoid:
-
Excessive body bending
-
Uneven leg lengths
-
Overlapping limbs
-
Extreme posture angles
Awareness helps prevent these errors. Simple corrections improve pose quality.
Pose Selection Tips for Beginners
Choose poses based on comfort. Practice one pose repeatedly first. Gradually introduce new poses.
Practice Tips:
-
Start with standing poses
-
Maintain consistent proportions
-
Use reference images
Regular practice improves pose control. Confidence grows with each sketch.
Beginner-Friendly Pose Comparison Table
| Pose Type | Difficulty Level | Best For |
|---|---|---|
| Straight standing | Very easy | Structure practice |
| One leg bent | Easy | Natural movement |
| Hand on waist | Easy | Style emphasis |
| Walking pose | Medium | Casual outfits |
| Crossed legs | Medium | Elegant designs |
Simple poses support strong learning. They build the base for advanced croquis poses.
Using Fashion Croquis Templates & Digital Tools
Fashion croquis templates simplify the drawing process. They help beginners start without fear. Digital tools add speed and flexibility. Both options support consistent practice. They reduce time spent on basic figure construction. This allows focus on design creativity.
What Are Fashion Croquis Templates
Fashion croquis templates are pre-drawn figure outlines. They follow correct fashion proportions. Designers reuse them for multiple sketches.
Template Features Include:
-
Standardized body proportions
-
Clean and balanced outlines
-
Ready-to-use figure bases
Templates save effort during early practice. They remove proportion guesswork completely.
Benefits of Using Croquis Templates
Templates support faster learning and consistency. They help beginners gain confidence quickly.
Key Benefits of Templates:
-
Time-saving sketch preparation
-
Accurate body proportions
-
Reusable drawing base
-
Reduced beginner frustration
Templates allow focus on clothing details. They support repeated design experimentation.
Types of Fashion Croquis Templates
Different templates suit different design needs. Beginners should start with simple ones.
Common Template Types:
-
Front view standing templates
-
Slight movement pose templates
-
Male and female croquis templates
-
Child croquis templates
Front view templates suit beginners best. They maintain balance and clarity.
How to Use Croquis Templates Effectively
Templates should guide, not restrict creativity. Use them as practice tools initially.
Effective Usage Tips:
-
Print templates for tracing practice
-
Sketch garments lightly over outlines
-
Avoid copying designs repeatedly
Gradually reduce template dependency. Practice freehand drawing alongside templates.
Introduction to Digital Fashion Croquis Tools
Digital tools support modern fashion illustration. They offer precision and editing flexibility. Many designers prefer digital workflows today.
Popular Digital Tool Categories:
-
Drawing tablets
-
Stylus pens
-
Illustration software
-
Fashion sketching apps
Digital tools suit fast-paced design environments. They allow smooth workflow management.
Advantages of Digital Croquis Tools
Digital tools offer multiple functional benefits. They improve efficiency and consistency.
Digital Tool Advantages:
-
Easy undo and redo options
-
Layer-based sketching control
-
Quick color experimentation
-
Clean and precise lines
Layers help separate body and clothing. This improves design organization significantly.
Using Layers in Digital Croquis
Layers simplify complex design handling. Each element stays on a separate layer.
Common Layer Usage:
-
Base croquis on bottom layer
-
Clothing on upper layers
-
Details on separate layers
Layer control prevents accidental mistakes. It supports clean design edits.
Combining Templates with Digital Tools
Templates and digital tools work best together. Digital templates eliminate printing needs. They offer unlimited reuse options.
Combined Usage Benefits:
-
Faster design setup
-
Consistent proportions digitally
-
Easy file storage
This combination suits beginners and professionals. It improves workflow efficiency.
Limitations of Templates and Digital Tools
Overuse may limit skill development. Beginners might depend too much.
Possible Limitations:
-
Reduced freehand drawing practice
-
Less proportion memorization
-
Over-reliance on software tools
Balance is essential for growth. Manual practice should continue alongside.
Choosing Between Templates and Digital Tools
Selection depends on personal comfort. Both methods offer learning advantages.
| Aspect | Templates | Digital Tools |
|---|---|---|
| Learning ease | Very beginner friendly | Requires basic software knowledge |
| Cost | Low or free | Higher initial investment |
| Editing | Manual adjustments | Instant digital edits |
| Portability | Paper dependent | Device dependent |
Both options support fashion croquis learning. Choose based on access and goals.
Building Skills with Smart Tool Usage
Tools should support skill development. They should not replace fundamentals. Use templates for learning proportions. Use digital tools for refining workflow.
Balanced practice builds strong illustration skills. Confidence grows with consistent usage.
Conclusion
Fashion croquis drawing becomes easier with proper guidance. Simple steps reduce fear and confusion. Understanding proportions builds strong design foundations. Easy poses improve confidence and control. Templates and digital tools support faster learning. Regular practice brings steady improvement.
Beginners should focus on clarity, not perfection. Consistency matters more than artistic talent. Croquis help express fashion ideas visually. They strengthen creativity and presentation skills. With patience, progress becomes visible. Fashion croquis open doors to confident designing.
Master Fashion Designing and Create Your Signature Style
Unlock your creative potential with our expert-led Fashion Designing course. Build in-demand skills and step confidently into the world of fashion!
Begin Your Fashion Career Today!Frequently Asked Questions
What is a fashion croquis used for?
A fashion croquis is used as a base figure for fashion design sketches. Designers draw clothing, accessories, and styling ideas over the croquis instead of repeatedly drawing the human body. This makes the design process faster and more organized. Croquis help designers focus on garment structure, fabric flow, and overall silhouette rather than body anatomy.
Is fashion croquis drawing difficult for beginners?
Fashion croquis drawing is not difficult for beginners when learned step by step. Most beginners struggle only because they try to achieve perfection too early. With simple guidelines and regular practice, croquis drawing becomes comfortable and enjoyable. Confidence improves as familiarity with proportions increases.
Do I need strong drawing skills to start fashion croquis?
Strong drawing skills are not required to start learning fashion croquis. Basic line drawing and shape understanding are enough in the beginning. Croquis drawing focuses more on proportions and posture rather than detailed realism. Skills naturally improve through repetition and observation.
Why are fashion croquis taller than real human figures?
Fashion croquis are intentionally drawn taller to create an elegant and stylish appearance. Elongated proportions help showcase garments more effectively. Long legs and slim torsos allow better visualization of fabric flow and outfit structure. This exaggeration is inspired by runway and editorial fashion.
How many head units should beginners use for croquis?
Beginners should start with a nine-head proportion system for fashion croquis. This proportion balances realism and fashion exaggeration well. It is easy to measure and maintain consistency while practicing. Once confidence develops, designers can explore other proportion styles.
Should facial features be drawn on fashion croquis?
Facial features are usually minimal or completely avoided in fashion croquis. The main purpose of a croquis is to highlight clothing, not facial expressions. Simple head shapes keep attention on the garments. Over-detailed faces may distract from the design.
Are fashion croquis templates useful for learning?
Fashion croquis templates are very useful for beginners. They provide correct proportions instantly and reduce the fear of drawing human figures. Templates help learners focus on clothing details and design creativity. However, freehand practice should continue alongside template usage.
Can fashion croquis be drawn using digital tools?
Yes, fashion croquis can be drawn using digital tools such as tablets and illustration software. Digital tools allow easy corrections, clean lines, and efficient workflow management. Layers make it easier to separate body structure and clothing. Digital methods are popular among modern fashion designers.
How long does it take to learn fashion croquis drawing?
The time required to learn fashion croquis depends on practice consistency. Basic skills can develop within a few weeks of regular practice. Short daily sessions are more effective than irregular long sessions. Progress becomes noticeable with patience and dedication.
Why is regular practice important for fashion croquis drawing?
Regular practice helps build muscle memory and improves proportion accuracy. It allows designers to draw faster and with more confidence. Mistakes reduce naturally with repeated effort. Consistent practice transforms croquis drawing into a comfortable creative habit.


