

Table of Contents
A Joint Measurement Sheet (JMS) is an official site document where both the contractor and the client jointly measure, verify, and sign off on quantities of work completed during a specific period. In essence, it serves as mutual proof that extra, variation, or additional works have actually been executed on site – not just planned.
In re-measured and lump-sum contracts especially, no payment or variation claim moves forward without a signed JMS, making it one of the most legally and financially significant documents in any construction project.
Get hands-on with our Quantity Surveyor course – sign up for a free demo!
Key Takeaways
- A JMS is jointly prepared and signed by both the contractor and the client (or their engineer/consultant).
- It is the primary document for supporting variation orders, running account bills, and extra-work claims.
- A properly maintained JMS protects both parties in audits, legal disputes, and financial reviews.
- Common mistakes – like recording estimates instead of actuals, or missing signatures – can invalidate the entire document.
- In 2026, digital JMS formats (Excel or cloud-based) are increasingly standard, but the core fields remain the same.
- Students and fresh graduates who understand JMS documentation have a clear advantage in interviews and on-site roles.
What is a Joint Measurement Sheet?

A Joint Measurement Sheet (JMS) is a document used in design and civil engineering projects, which is to register the actual amount of work done on site. It is jointly prepared, verified and signed by representatives of both the contractor and the customer (or project advisor). The purpose of a JMS is to ensure that it is a mutual agreement to measure complete work before increasing the bill or processing of payment.
Key Features of a Joint Measurement Sheet:
-
Collaborative process: Measurements are taken and recorded in the presence of both parties.
-
Accuracy: Prevents disputes by providing a clear and agreed-upon record.
-
Billing support: Acts as the basis for interim or final payment certificates.
-
Project tracking: Helps monitor the progress of work against the schedule.
Why Joint Measurement Matters in Construction
1: What is the main purpose of a Bill of Quantities (BoQ)?
Construction projects today are more data-driven, audit-prone, and contractually tight than ever before. Government infrastructure projects, private commercial builds, and PPP contracts all demand rigorous documentation before a single payment is certified.
Here’s why the JMS is central to that documentation chain:
Prevents quantity disputes.
When both sides physically measure and sign the same sheet, there is no room for one party to later claim a different figure. The signed JMS is the agreed record – period.
Validates variation and extra-work bills.
Any work that falls outside the original scope needs a paper trail before it can be billed. The JMS is that trail. Without it, variation claims can be rejected outright, regardless of how much actual work was done.
Satisfies audit and legal requirements.
Government contracts in particular require JMS records as part of financial audits. In legal or arbitration proceedings, a well-maintained JMS carries significant evidentiary weight – it shows both parties agreed to the quantities on a specific date.
Supports Extension of Time (EOT) claims.
When a contractor claims extra time due to additional or varied work, the JMS provides the quantitative basis to justify that claim.
Tracks real project progress.
Comparing JMS records across billing periods gives project managers an accurate picture of site productivity versus the planned schedule – far more reliable than progress reports alone.
Importance of Accurate Joint Measurement
Exact joint measurement is the cornerstone of successful construction project management. This not only ensures openness, but also promotes trust and responsibility between stakeholders. Here, accuracy in joint measurement is seriously important:
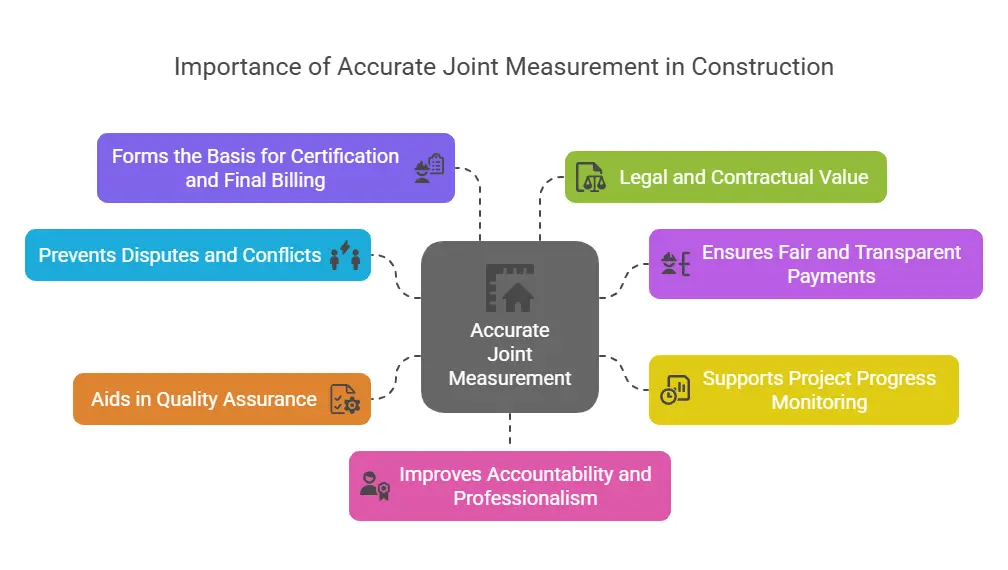
1. Prevents Disputes and Conflicts
One of the biggest benefits of accurate joint measurement is that it reduces disagreement between contractors and customers. Since both sides are involved in measuring and verifying the work, there is a shared understanding of what has been done, which is very less space for volume or invoicing disputes.
2. Ensures Fair and Transparent Payments
Accurate joint measurement forms the basis for generating contractor bills. If the measurements are incorrect, the payment may either be unfair to the contractor (underpayment) or to the client (overpayment). A precise JMS ensures that the contractor is paid exactly for the work done, maintaining fairness and financial integrity.
3. Supports Project Progress Monitoring
With regular and correct joint measurements, undertaking managers can carefully song the development of the paintings. It enables in evaluating the real paintings completed towards the deliberate agenda and figuring out any delays or discrepancies early on.
4. Aids in Quality Assurance
Accurate joint measurement regularly is going hand-in-hand with website inspections. During the procedure, engineers and supervisors also can take a look at the best of the completed work, ensuring it aligns with undertaking specs and standards.
5. Forms the Basis for Certification and Final Billing
Before the issuance of interim or final payment certificates, joint measurements serve as official documentation to justify the quantities claimed by the contractor. Without this documentation, it becomes challenging for clients or consultants to certify payments.
6. Legal and Contractual Value
In the case of audits or legal disputes, a well-maintained Joint Measurement Sheet acts as solid evidence. It shows that both parties agreed to the recorded work quantities, which can help resolve claims or contractual issues.
7. Improves Accountability and Professionalism
When both parties are required to jointly take and sign off on measurements, it encourages a more professional approach to record-keeping. It holds all stakeholders accountable for their roles in the project.
Master Quantity Surveying – Build a Rewarding Career Today!
Gain in-demand skills in cost estimation, project budgeting, and contract management with our Quantity Surveying Course. Learn from industry experts and boost your career in construction and infrastructure. Enroll now and take the first step toward success!
Know MoreJoint Measurement Sheet Format – Fields You Must Know
Most modern JMS formats, whether paper-based or digital, follow a standardized table structure. Understanding each field is essential – not just for filling the sheet, but for interpreting and defending the numbers in billing meetings and audits.
| Field | What It Captures |
| Date | The exact date measurements were taken on site |
| Location / Item Code | Drawing number and BoQ item reference |
| Description of Work | Type of work: concrete, brickwork, excavation, etc. |
| Dimensions | Length, breadth, depth, thickness, diameter as applicable |
| Unit | m, m², m³, No., kg — as per the BoQ |
| No. of Units | Count of similar items measured |
| Rate | Contract rate linked to the BoQ item |
| Amount | Calculated value (Quantity × Rate) |
| Remarks | Variation order reference, deviations, deductions |
| Signatures | Contractor, client/consultant, quantity surveyor, witness |
A Note on Digital Formats:
Many firms in 2026 use Excel-based or cloud-hosted JMS templates that auto-calculate quantities and flag formula errors. The core fields remain identical – what changes is the audit trail, version control, and the speed of sharing signed copies across project teams.
Step-by-Step Guide to Preparing a Joint Measurement Sheet
Whether you are a site engineer, a quantity surveyor, or an intern handling measurements for the first time, this process applies universally.
Before You Go to Site
Collect the approved drawings, the Bill of Quantities, and any variation order relevant to the work you are measuring. Confirm the measurement date and location with both the contractor and the client/consultant – both must be physically present. Prepare a blank JMS in the correct format and carry printed copies (plus your measuring tools: tape, laser meter, levelling instrument as needed).
During Measurement on Site
Measure only completed and approved work. Do not record work that is pending inspection, partially done, or not yet approved. Note actual dimensions directly from the field – length, breadth, depth, diameter — and record any deviation from the drawings in the remarks column. If there are deductions (window openings, column voids), measure and record those separately.
Filling the Sheet
Enter data clearly – item description, drawing reference, dimensions, unit, quantity, and rate. Cross-check your arithmetic on the spot: area = L × B; volume = L × B × D. Any variation or extra work must reference its official variation order number in the remarks column. Get both parties to sign on the same day if at all possible. A JMS signed days later, off-site, is harder to defend.
After Measurement
File a hard copy in the site record room and share a digital copy through the project’s document management system if one is in use. This signed JMS then feeds directly into the preparation of running account bills, measurement books, and variation claims.
Common Mistakes to Avoid
Many graduates and junior engineers lose credibility on site – and marks in interviews – because they are unaware of how easily a JMS can be invalidated. The most frequent errors are:
Recording estimated figures instead of actual measurements.
A JMS must reflect what was physically measured on that date. Estimating quantities – even reasonable ones – makes the document legally and contractually weak.
Missing signatures from one or both parties.
A JMS without signatures from both the contractor and the client/consultant is not a joint measurement sheet. It is just a sheet. Signatures are what give it binding value.
Mixing approved and unapproved extra works in the same entry.
Every line item must relate to work that has been officially approved and instructed. Bundling in unapproved items creates disputes and can invalidate the entire bill.
Omitting variation order references.
If the work you are measuring is extra or varied work, the relevant variation order number must appear in the remarks. Without this link, the client’s QS has grounds to reject the claim.
Not recording deductions.
Openings, voids, and excluded areas must be measured and deducted transparently. Inflating net quantities – even accidentally – is a serious audit risk.
Master Quantity Surveying – Build a Rewarding Career Today!
Gain in-demand skills in cost estimation, project budgeting, and contract management with our Quantity Surveying Course. Learn from industry experts and boost your career in construction and infrastructure. Enroll now and take the first step toward success!
Know MoreHow JMS Helps in Exams, Interviews, and Site Jobs
Colleges and recruitment teams increasingly test practical documentation knowledge, not just design theory. Understanding JMS is especially valuable for roles in quantity surveying, project management, site supervision, and civil engineering contracting.
Questions that come up regularly:
- “Explain the purpose and importance of a Joint Measurement Sheet.”
- “What are the key fields in a JMS and what does each capture?”
- “How is a JMS used to support variation claims and running account bills?”
- “What are the common mistakes made in JMS preparation?”
Your competitive edge in 2026 is that you can speak not just to the format but to the practical stakes: why signatures matter legally, how digital templates are being used on modern sites, what happens to a payment claim without a signed JMS. These are the answers that turn a textbook response into a site-ready one.
Best Practices for Students and Young Professionals
If you are transitioning from college to your first site role, these habits will set you apart from day one:
Always carry the approved drawing and BoQ when going for measurement – measuring without them leads to errors and rework. Use standard units consistently, exactly as specified in the BoQ. Get signatures on the day of measurement, not the next morning. Link every extra or variation item to its official variation order number from the first entry.
Treat the JMS as a learning document – watch how senior engineers and QS professionals fill it, ask questions about what goes in the remarks column, and understand why certain items are deducted.
The discipline of accurate documentation is a career-defining habit. Engineers who can walk into a billing meeting with a clean, signed, fully referenced JMS earn trust fast.
Get hands-on with our Quantity Surveyor course – sign up for a free demo!
Conclusion
A Joint Measurement Sheet is far more than a paperwork formality – it is the contractual and financial foundation of how construction work gets measured, agreed upon, and paid for. In 2026, as projects face tighter audit requirements, more complex variation claims, and faster billing cycles, a clean JMS is what separates smooth project delivery from prolonged disputes.
For students and professionals alike, mastering JMS preparation – its format, its process, and its common pitfalls – is one of the most practical and immediately applicable skills in construction documentation. Start treating it as one.
|
RELATED POSTS |
|
|
How To Build A Strong LinkedIn Profile For Quantity Surveying Jobs |
|
Master Quantity Surveying – Build a Rewarding Career Today!
Gain in-demand skills in cost estimation, project budgeting, and contract management with our Quantity Surveying Course. Learn from industry experts and boost your career in construction and infrastructure. Enroll now and take the first step toward success!
Know MoreFrequently Asked Questions
What is the purpose of a Joint Measurement Sheet (JMS)?
A Joint Measurement Sheet is used to record the actual work done at a construction site, measured and verified jointly by the contractor and the client or engineer. Its main purpose is to ensure accurate billing, maintain transparency, and avoid disputes over work quantities.
Who is responsible for preparing the Joint Measurement Sheet?
Typically, the site engineer or quantity surveyor prepares the JMS in collaboration with the contractor’s representative. Both parties must be present during measurement and sign the document to confirm its accuracy.
Can Joint Measurement Sheets be used as legal proof in case of disputes?
Yes, a signed Joint Measurement Sheet serves as a legally recognized document. Since it contains agreed-upon quantities with signatures from both parties, it can be used as evidence in resolving claims or disputes related to project work.
How often should joint measurements be taken?
Joint measurements are usually taken at regular intervals, such as before raising Running Account (RA) bills or completing specific stages of work. The frequency can also depend on the contract terms, work schedule, and project size.


