
Table of Contents
Dhanurasana is a front and backward bending yoga position. At the same time it enhances flexibility, balance and strength. This yoga pose is also called “Bow Pose” and is also known as Dhanurasana.
If you are lying on your stomach you can slowly drop your torso and thighs off the ground by bending at the knees and grabbing your ankles. You can bring down the height of your body.
Regular practice of the Bow Pose has many benefits including increasing the flexibility of the spine, toning the back and core muscles and opening the front of the body.
However, it is of the utmost significance to do the position gently and calm without placing any undue tension on the stretch.
Join the best online yoga teacher training program of 2026! Register in Entri Elevate now!
Key Takeaways:
- The Bow Pose is called Dhanurasana.
- This is great for the back, core and legs.
- It opens up the chest, shoulders, hips and thighs.
- Yoga strap – That would be helpful for the beginners.
- Always warm up and go slowly.
- Do not force the pose, stop if you experience intense discomfort.
- Regular practice can enhance flexibility, strength and body awareness.
How to Do Bow Pose: Steps, Benefits and Safety Tips
The bow exercise, commonly referred to as Dhanurasana, is a back-bending yoga pose that strengthens the back, core, and legs. It is performed while stretching the front of the body. Assuming a position in which you are lying on your stomach, you grip your ankles and lift your body and thighs off the ground above you.
Performing Bow Pose with the appropriate movement technique has the ability to improve flexibility, posture, and general body strength. Bow Pose is a yoga pose that may be practiced by anyone.
What is Bow Pose in Yoga?
1: Which of these is the primary goal of yoga practice?
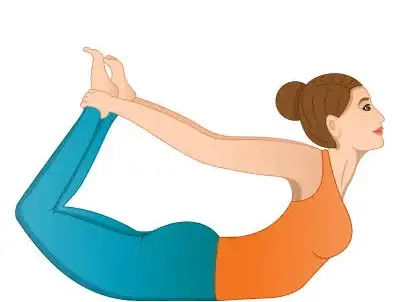
The Dhanurasana or the Bow Pose is one of the classic yoga asanas that are backbends. The expression is based on the bow-shaped curve of the body with the arms as the string.
To get into this posture you will be on your stomach and have your knees bent. You will utilize your ankles to elevate your torso and thighs off the ground without bending your ankles.
The Bow Pose is one of the yoga poses that require balance, flexibility and strength. Excellent for your shoulders, back and core as well as your legs. Therefore, the chest, the tummy and the front of the thighs all appear to be longer.
Because deep backbends have the potential to create strain in the lower back if they are not performed correctly, they should be mastered gradually.
Become a Certified Yoga Instructor
Yoga Teacher Training Course by Entri App: Master authentic yoga techniques, earn certification, and build a successful career as a professional yoga instructor.
Join Now!How to Do Bow Pose Step by Step
Here are safe and aligned ways to practice the Bow Pose (Dhanurasana):
- First, get down on your stomach, legs up behind you on a yoga mat. Let your arms dangle at your sides. Drop your shoulders down to the earth.
- Kneel down to the ground. Slowly bend both knees bringing heels toward hips. Place your knees at the width of your hips.
- Break the ankles Lock your ankles if you’re behind. Don’t keep your feet or toes in any posture.
- Take deep breaths and tighten the muscles in your abdominal muscle group before you start. Don’t turn your head, relax your neck.
- Breathe in and press through your ankles to lift your hands, pulling your upper body and thighs off the floor. “Use your back and your knees instead of your arms to get the job done.
- Keep a healthy posture: Inhale a fluid way and look a little forward. Hold the posture for 15 to 30 seconds or longer if you are comfortable.
- The release, slowly: Breathe out, releasing your body, thighs and feet to the mat. Exhale. Loosen your ankles, straighten them.
- Look to one side of your head, and breathe for a moment. If you want you can do the pose again.
Benefits of Bow Pose
Bow Pose (Dhanurasana) is a dynamic backbend that combines stretch and strength. It can offer various physical benefits when done with good alignment and without forcing the body.
1. Fortifies the Back
The Bow Pose works the muscles along the spine especially as you lift your chest and knees off the floor. Regular physical activity could assist to rebuild strength and increase stability in daily movements.”
2. Increases Flexibility
The position opens up the front of the body, from chest to shoulders, abdomen, hip flexors, and thighs. Doing this little by little can help you become more flexible overall.
3. Open chest and shoulders
As the chest pulls away from the floor, the shoulders move backward and the chest opens out. This can assist to offset stiffness from lengthy periods of sitting or using electronics.
4. Constructs the Core
Your abdominal and core muscles are what stabilize your body when you backbend. It can help enhance core control and stability of the body.
5. Leg and hip exercises
Lifting the legs activates the thigh, hamstring, glute and hip musculature. One of the best postures to do lower-body backwork is the Bow Pose.
6. Good for Posture
Bow Pose builds strength in the back and opens the chest and shoulders, which can improve posture when it’s part of a well-rounded yoga routine.
7. Improves coordination and body awareness
Bow Pose brings together the arms, legs, back, and core. Standing in the posture and breathing steadily might be good for the capacity to concentrate and stay in perfect body alignment.
8. Enhances controlled-breathing method
This position promotes abnormal breathing when the chest is elevated and the abdomen is forced down onto the floor. You can become conscious of your respiratory system by breathing slowly and enjoying it.
Muscles Worked During Bow Pose
Bow Pose (Dhanurasana) is a full-body yoga pose that involves a deep backbend and dynamic chest and leg raise. Different muscle groups work together to hold the position and govern the movement.
1. The Back Muscles
The erector spinae and other muscles of the back flex to assist elevate the chest away from the ground. They are vital in stabilizing the spine during the backbend.
2. Core Muscles
Lift the chest and legs while bracing the abdominal muscles to stabilize the torso. A regulated core prevents excessive movement and maintains optimum alignment.
3. Butt Muscles
The gluteal muscles extend the hips and assist in raising the thighs off the floor. They also give stability in the posture.
4. Quads
The legs are elevated and the knees are kept bent as the quadriceps muscles at the front of the thighs are working. They also get a stretch during the position.
5. Hamstrings
The hamstrings are muscles on the back of the thighs. They help govern the bent-leg position, and aid to move the hips and legs.
6. Hip flexor
The thighs lift away from the floor and the knees stay bent, stretching the hip flexors. For some, Bow Pose can seem more intense because of tight hips.
7. Upper back and shoulders
The upper-back and shoulder muscles are working to extend the arms backward and to keep the hands and ankles together. The chest and shoulders are also stretched out.
8. Muscles of the chest
The chest opens and raises, stretching the pectorals, or chest muscles. This adds to the chest-opening quality of the position.
Become a Certified Yoga Instructor
Yoga Teacher Training Course by Entri App: Master authentic yoga techniques, earn certification, and build a successful career as a professional yoga instructor.
Join Now!Common Mistakes to Avoid in Bow Pose
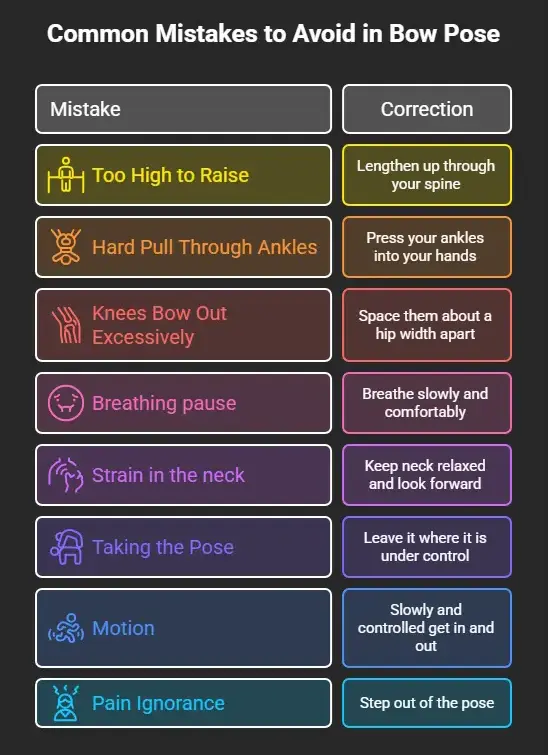
Bow Pose demands good coordination and control of movement. Avoiding these common faults you will find the posture more comfortable and take away unnecessary strain.
1. Too High to Raise
Trying to lift the chest and thighs as high as you can will overstrain the lower back. Try to lengthen up through your spine not try to bend deeper.
2. Hard Pull through Ankles
Do not use your arms to pull your feet toward your head. Instead, press your ankles into your hands to create a more even lift through chest and legs.
3. Knees Bow Out Excessively
And if you let the knees splay out too far, you lose stability and ruin the positioning. Space them about a hip width apart. Don’t squash them in together.
4. Breathing pause
Holding your breath might create extra tension. Try to breathe slowly and comfortably in the position.
5. Strain in the neck
Look up too high or turn your head too fast and you can strain your neck. Your neck should be relaxed and your eyes should be looking naturally forward or slightly up.
6. Taking the Pose
Flexibility is something that is built over time. Do not push your body into a deeper backbend if you have tightness or discomfort. Leave it where it appears to be under control.
7. Motion
If you swing or rock your body to get into Bow Pose, you may overstrain yourself. Slowly and controlled get in and out of the stance.
8. Pain Ignorance
Mild stretch feeling is normal, not sharp, abrupt or chronic pain. If you experience pain, step out of the pose and allow your body to recuperate.
How to Modify Bow Pose for Beginners
As a novice, you may find Bow Pose tough due to the flexibility it demands in your shoulders, hips, thighs, and back. If you’re just starting out, it’s best to work on smaller variations of the posture until you’re strong and flexible enough to tackle the full version.
- Practice one leg at a time: Bend one knee and grip the ankle, leaving the other leg relaxed. This takes the tension down a notch and makes the action more understandable.
- Use a yoga strap: If you can’t comfortably reach your ankles, loop a yoga strap over each ankle and grasp the ends with your hands.
- Keep the lift small: You don’t have to lift your chest and thighs extremely high. Start with a small lift and work your way up as your flexibility increases.
- Preparation poses: Light thigh, shoulder, hip and back stretches will assist prepare the body for Bow Pose.
- Hold for less time: Beginners might begin by holding the pose for a few comfortable breaths rather than trying to hold it for a long duration.
Safety Precautions for Bow Pose
Dhanurasana (Bow Pose) Dhanurasana is a deep back bend requiring power and flexibility. Do it right to avoid soreness in your lower back, neck, shoulders and knees. Keep these safety tips in mind:
1. Warm-up prior to practice
Always warm up before doing Bow Pose. Gentle backbends to open the spine, shoulders, hips, thighs and chest can be safely deepened.
2. Don’t Forcibly Push Backbend
Don’t try to get your chest and your legs way up. More depth doesn’t necessarily improve the position. Practice moving easily, and gradually enhance your flexibility.
3. Back Protection
If done wrong, this pose might strain the lower back. Slowly elevate the chest and legs without strongly compressing the lower spine. “If your lower back hurts, get out of the stance.
4. Take it gradually and careful
Do not bounce, jerk or lift with momentum. Slowly go into the stance, hold it, and get out of it. You can check your alignment better with careful movements.
5. Don’t yank your ankles violently
Gentle hand-foot coordination is key. Instead than tugging on your ankles, push your ankles into your palms and let your chest and thighs to raise naturally.
6. Loosen Your Neck
Don’t look up or behind. Look naturally forward with your eyes and keep your neck relaxed. The neck should follow the movement of the spine, not be forced into an excessive posture.
7. Breath regularly
Breathe gently and comfortably while you hold the pose. Breath-holding induces stress and postural control impairment. If the stance is unpleasant, loosen it up and take a rest.
8. Use Beginner Modifications
If it’s uncomfortable, don’t push yourself to reach your ankles. Try a yoga strap to stretch more. Before the full posture try a one leg variation.
9. Stop if painful
Expect a slow stretching feeling, not a sharp, sudden, or increasing discomfort. If your back, neck, knees or shoulders hurt, come out of the pose and take a rest.
10. Know When to Avoid the Pose
Avoid or modify Bow Pose if you have a problem with your back, neck, shoulder, hip, knee or wrist. If you are wounded, recovering from surgery, or advised against deep backbends, see a physician first.
11. Practice on Solid Ground
Good to have yoga mats or anything non-slip. It can help prevent your hands and torso from sliding in or out of the posture.
12. Listen to what your body tells you
People have different flexibilities. Don’t compare your posture or range of motion to others. Work within your capacity, and take time to improve strength, mobility and control gradually.
Want to Step Up? Join our Yoga Instructor Course Online!
Conclusion
Dhanurasana or Bow pose is an energetic yoga practice focusing on strengthening and balancing various muscle groups. The goal of this workout is to build a strong core and chest and shoulders and hips and thighs.
The beginner practitioner should not be so much concerned with obtaining a deep bend as they should be concerned with being in the right position and moving with control.
Bow Pose is a strong addition to a balanced yoga program, when practiced consistently and with focus.
Become a Certified Yoga Instructor
Yoga Teacher Training Course by Entri App: Master authentic yoga techniques, earn certification, and build a successful career as a professional yoga instructor.
Join Now!Frequently Asked Questions
Can I do Bow Pose every day?
It can be included regularly in a balanced yoga routine, but there is no need to practice it every day. Allow your body to rest if you experience soreness or discomfort.
Why does my lower back hurt during Bow Pose?
Lower-back discomfort can occur when the backbend is too deep or the movement is not well controlled. Reduce the intensity, focus on lifting through the chest and legs, and stop if you experience pain.
What should I do if I cannot reach my ankles?
Try using a yoga strap around the ankles to extend your reach. You can also practice preparatory stretches and a one-leg variation until your mobility improves.
Who should avoid Bow Pose?
People with certain back, neck, shoulder, hip, or knee injuries may need to avoid or modify the pose. If you have an injury or medical condition, seek guidance from an appropriate healthcare professional before practicing it.
Is Bow Pose suitable for beginners?
Yes, but beginners should start gently. Using a yoga strap, practicing a one-leg variation, or keeping the lift low can make the pose more accessible.
How long should you hold Bow Pose?
Beginners can start with 10–15 seconds or a few comfortable breaths. With practice, the duration can gradually increase as long as the pose remains comfortable and controlled.
Can Bow Pose improve flexibility?
Regular, gradual practice may improve flexibility in areas such as the shoulders, chest, hips, thighs, and spine. Flexibility develops over time, so the pose should not be forced.
Should I do Bow Pose before or after other yoga poses?
Bow Pose is generally better practiced after a gentle warm-up because it is a deeper backbend. It can be followed by gentle neutral or restorative movements to help the body relax.
How many times should I repeat Bow Pose?
Beginners can start with 1–2 repetitions, holding each for a few comfortable breaths. The number of repetitions can gradually increase based on comfort and experience.
Can I practice Bow Pose if I have tight thighs?
You can try a modified version if it feels comfortable. Gentle thigh and hip stretches may help prepare your body. Never force the knees or hips into a deeper position.